Showing posts with label sweet treats. Show all posts

Friday, 9 December 2016

Reindeer Cupcakes

These sweet little faces are almost too cute to eat. A carrot cupcake topped with cute decorations to make a festive party treat!
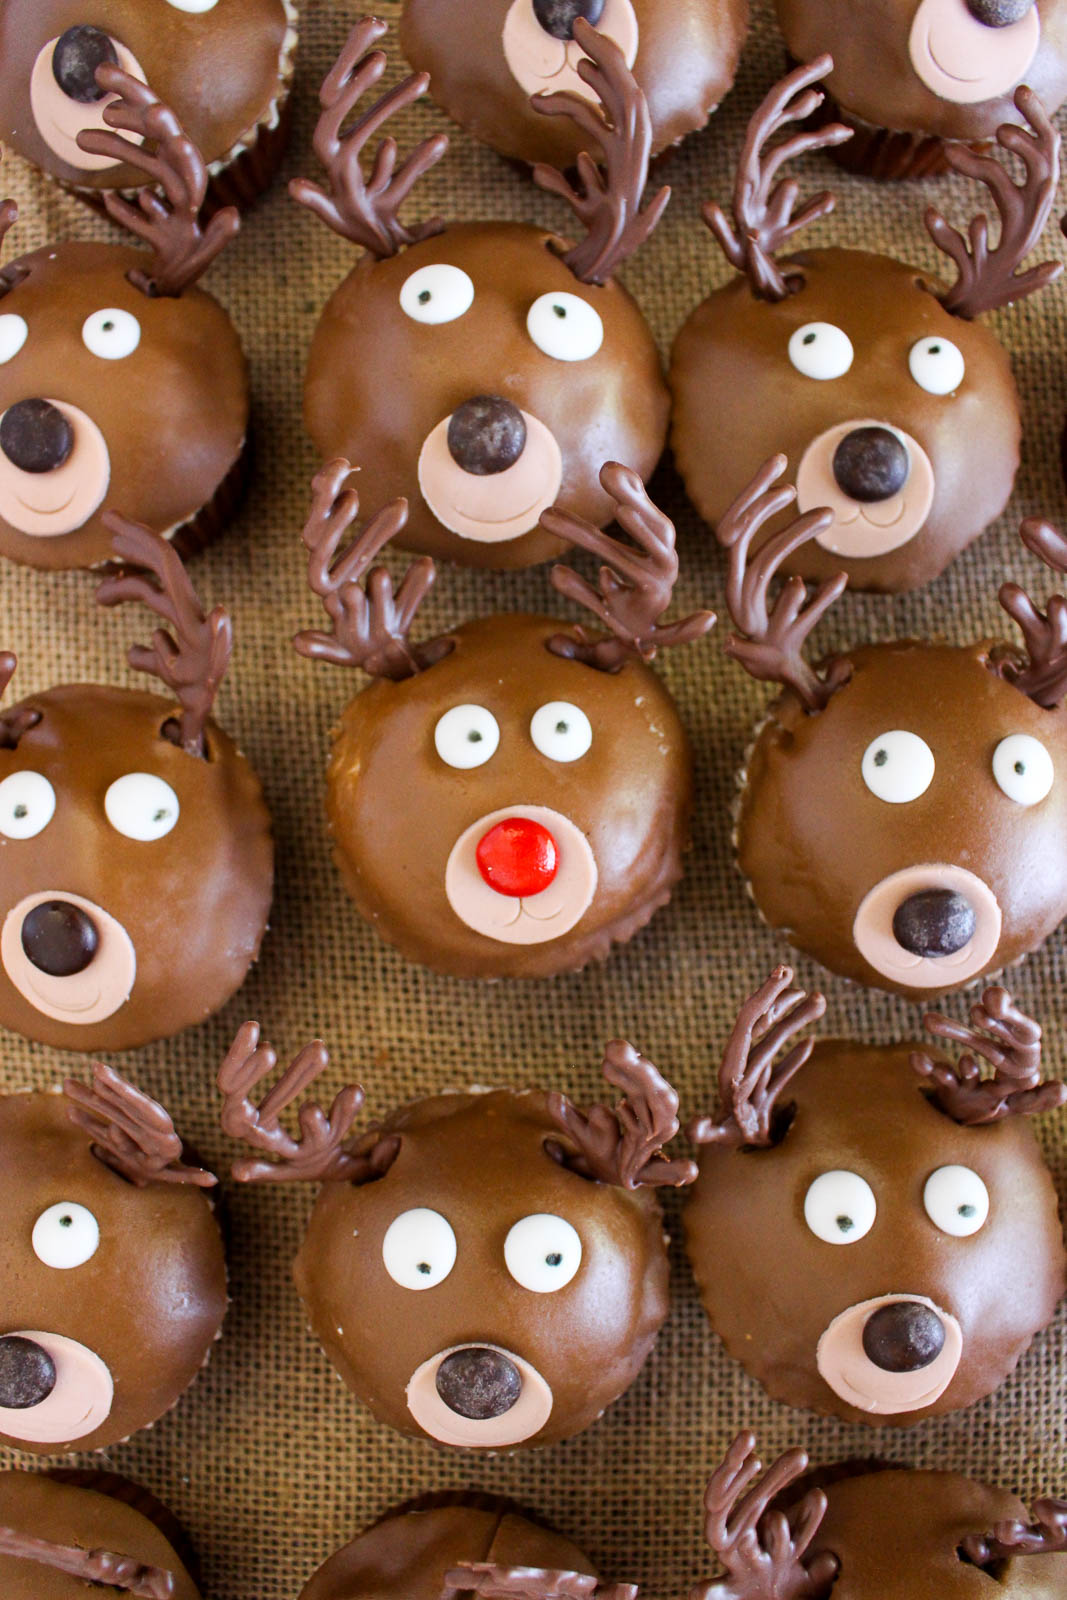
Reindeer Cupcakes Cassie Cakes

My Christmas baking is running a little behind due to the celebrating starting early. Hangovers make baking seem like a mammoth task...or a reindeer task? But Christmas is important and Santa waits for no one.
Reindeer Cupcakes Cassie Cakes

And these are cute as hell. You know I can't stop saying "as hell". I finish every sentence where I want to be emphatic with it. "That's rude as hell!", "That's pretty as hell!",  "I'm confused as hell!" And my favourite, "That's DUMB as HELL!" Try it. You won't be able to stop.
Reindeer Cupcakes Cassie Cakes

Reindeer Cupcakes Cassie Cakes

Reindeer Cupcakes Cassie Cakes

But do you know what, these are as cute as hell. Of course they're perfect for Christmas but...okay I can't think of any other time of year they'd suit. But that doesn't mean they're any less cute! Perhaps somehow they could be made in to bunnies for Easter. Bunnies like carrots too.
Reindeer Cupcakes Cassie Cakes

So anyway. These darling little cupcakes are carrot cupcakes! Do you know why? Cos what do you leave out for Santa and his reindeer? Carrots, that's what! How twee is that! Carrot cupcakes with reindeer faces! Cute central. If you put 'cute central' into Google Maps, your address will come up with these guys in your kitchen.

Here are some step by step photos for the fondant work.

Reindeer Cupcakes Cassie Cakes
Select a round cutter a little larger than your cupcake.
Knead together white and pre-coloured brown fondant to make a darker shade and lighter shade of brown. Keep the fondant tightly wrapped when not working with the fondant.
Ice the cupcake with buttercream to a slightly domed shape.
Cut a round of darker brown fondant.

Reindeer Cupcakes Cassie Cakes
Lightly press the large over the buttercream.
Using the back of a piping tip, cut a smaller circle from the lighter brown fondant and attach to the darker brown with a tiny dab of buttercream.
Lightly press the edge of the piping tip in to the light brown circle to make the mouth of the deer.
Attach a dark brown M&M to the light brown circle to make the nose of the deer, then add the premade eyes.

Reindeer Cupcakes Cassie Cakes

There is a bit of fondant work with this but it's basically the easiest fondant use ever. Rolling and cutting circles. You'll need two shades of brown for these cupcakes. I purchased pre-coloured brown fondant the colour I wanted to the head of the reindeer to be and then I created the lighter brown by rolling some white fondant in to a bit of the darker fondant. This was easier than buying only white and colouring it. Less mess, less fuss and more consistent results.
Reindeer Cupcakes Cassie Cakes

I used my old standby cupcake recipe and altered it a bit by adding carrots, vegetable oil and some pulverized walnuts. A lot of carrot cupcake recipes out in the great big world seemed more like muffins. They were dense and didn't have the height of a light and fluffy traditional cupcake. Being the Dr. Frankenstein that I am, I simply altered a vanilla cupcake. And it worked.
Reindeer Cupcakes Cassie Cakes

The reindeer also have cute little eye which I made by piping royal icing. I can't tell you how sick of piping icing I was by the end of this, this made far more than I needed. However, once the discs are well dried, you can store them in an airtight container for other projects. To create the pupils, I dotted the discs with a food safe pen. I purchased a specific food pen for this but since making them, I've read that you can use a non-toxic pen purchased from the supermarket, the type kids use for their colouring books.
Reindeer Cupcakes Cassie Cakes

Finally, you will just need to pipe the antlers with some melted chocolate. You can use this template or freestyle it if you've got a steady hand. Make sure you pipe the base of the antlers nice and thick, I found the thinner ones broke easily. To make the chocolate antlers easier to use, make sure they're cold from the fridge and use a small knife to make an incision in the fondant first, then stick the chocolate antlers in.
Reindeer Cupcakes Cassie Cakes

Also, cos it's Christmas, enjoy these photos of my own little reindeer.

Reindeer Cupcakes Cassie Cakes

Reindeer Cupcakes Cassie Cakes

Reindeer Cupcakes Cassie Cakes

Reindeer Cupcakes Cassie Cakes


Reindeer Face Carrot Cupcakes
*Royal icing eyes need time to set so make at least 24 hours in advance. Royal icing eyes can be made well in advance and kept in an airtight container once completely dried.

Prep time: 60 mins, not including drying time

Cooking time: 20 mins

Total time:  1 hr and 20 mins
Servings: 18 cupcakes

Royal Icing Eyes

2 egg whites

1 1/3 cups confectioners sugar, sifted

Black food safe pen
  1. Combine the egg white and sugar in a medium bowl and beat on medium speed for 4-5 minutes, scraping down sides as necessary.
  2. Beat til icing is a thick but pipeable consistency, like molten lava. Add water if the icing is too thick or more sifted icing sugar if too thin
  3. Add the frosting to a piping bag with a small round tip
  4. Lay a large piece of baking paper on to a baking sheet and pipe small circles to make an eye shape.
  5. Allow to dry at room temperature for at least 24 hours before removing from baking sheet. Once dry, dot each eye with the black pen to make an pupil.
Chocolate Antlers
150g chocolate melts

  1. Print out the template and place on a baking sheet. Lay a piece of baking paper over the top.
  2. Melt the chocolate in 30 second intervals until completely melted.
  3. Add melted chocolate into a piping bag fitted with a fine piping tip and pipe antlers on to baking paper, following pattern as on the template. Use a skewer or toothpick to move chocolate in to the gaps as required.
  4. Allow to dry and chill in fridge.


Carrot Cupcakes
110g softened butter
230g caster sugar
2 eggs, free range
150g plain cake flour
125g self-raising cake flour

1 teaspoon cinnamon
1/2 freshly grated nutmeg
1 teaspoon vanilla extract
2 tablespoons vegetable oil
1/2 cup milk
1 cup freshly grated carrots
125g crumbled walnuts
  1. Preheat the oven to 160°C and line a 12-hole cupcake tin.
  2. Beat the sugar and butter together until lighter in colour.
  3. Add eggs one at a time, beating well after each addition.
  4. Sift the flours into one bowl and stir the cinnamon and nutmeg into the flour.
  5. Add the vanilla extract and vegetable oil into the milk.
  6. Add to the creamed mixture alternately with the milk, in three lots, starting and finishing with the flour.
  7. Gently fold the grated carrot and walnuts into the batter until combined.
  8. Fill each cupcake liner two-thirds full, or about 50g on scales.
  9. Bake for 20 to 23 minutes, leave in the tin for 5 minutes then turn on to a rack to cool. 
Vanilla Buttercream

1 cup butter, at room temperature

2 cups icing sugar
1 tablespoon vanilla extract
2 tablespoons milk

  1. Using the whisk attachment of a stand mixer, whip the butter on medium-high speed for 5 minutes, scraping down the sides of the bowl as required.
  2. Reduce the speed to low and gradually add the icing sugar. Once all of the sugar is incorporated, increase the speed to medium-high and add the vanilla and milk, mixing until incorporated. Whip at medium-high speed until light and fluffy, about 2 minutes, scraping the bowl as needed.


Assembly
Pre-coloured brown and white fondant
Colours will vary, use as much fondant as required.
Brown and red M&M's
  1. Ice each cupcake with vanilla buttercream and set aside.
  2. Dust a rolling mat or benchtop with icing sugar.
  3. Knead white fondant into pre-coloured brown fondant to create a dark brown colour for the reindeers face.
  4. Using a little more white fondant, make a lighter brown colour for the reindeers muzzle.
  5. Dust more icing sugar onto bench as required and roll out the dark brown fondant.
  6. Use a circle cutter to cut a circle at a time. Cover remaining fondant with plastic wrap when not in use.
  7. Gently work the circle on to a cupcake. Repeat until all cupcakes have fondant applied.
  8. Roll out the lighter brown colour and use the larger end of a piping tip to cut smaller circles.
  9. Use a dab of buttercream to attach the lighter brown circle to the face of the reindeer, then use the piping tip to lightly indent a mouth into the lighter brown circle. Repeat for all cupcakes.
  10. Using a tiny dab of buttercream, attach an M&M to each reindeers face and a pair of royal icing eyes.
  11. Finally, push a pair of chocolate antlers into each of the cupcakes.

Wednesday, 3 August 2016

RSPCA Puppy Cakes

Make these delicious honey flavoured cupcake with a sweet peanut butter and cream cheese centre and toasted meringue topping to raise funds for the RSPCA and share them with your four legged friend!
Cassie Cakes RSPCA Puppy Cakes
Obviously don't top the human cupcakes with dog-chocolate and bone treats...unless you want to.
Now. I don't know if you know but I love dogs. I adore them. I'm obsessed with them. I have a folder on my phone full of photos I've met on the street. I have over 60 kilos of dog that lives inside my house, two dogs who literally are my children. My puppies are a 6 year old German Shepherd named Stompypants and a 5 year old yellow Labrador named Puca but her name really should be Cheekypants. And I'm working on getting a rescue pug who I plan on naming Sausage.
Cassie Cakes RSPCA Puppy Cakes
Two dignified ladies, ready for their picnic.
As you can see, when I am on the topic of dogs, I can talk forever and I do get sidetracked in lovely puppy kisses and wet noses and wagging tails. My puppies are so spoilt, treats, fresh food, water, daily walks...but not all dogs are so lucky. Some dogs, through no fault of their own, have no warm place to put their fluffy bum and no one to pet their pretty heads. Some dogs are born into puppy farms or on the street. Some puppies are mistreated or suddenly can't be looked after anymore.
Cassie Cakes RSPCA Puppy Cakes
Oh that looks good..
Cassie Cakes RSPCA Puppy Cakes
...can I have it?...

Cassie Cakes RSPCA Puppy Cakes
AWESOME!
But thank the canine stars that we have the RSPCA. The RSPCA do vital work. They house and feed and give life saving medical attention to literally tens of thousands of dogs across Australia each year. And their care and welfare doesn't just stop with woman's best friend! They care for cats, birds, horses, chickens, snakes, Guinea pigs, rats, mice, lizards...all of our furry, scaly, feathery friends. Haven personally volunteered at RSPCA, I can tell you the care they give to animals is outstanding and wonderful.

This care doesn't come cheap. RSPCA QLD needs $42 million a year to keep running. And 99% of their funding comes from donations from people like me and you! And here's where you get to make a real difference. August 15 is RSPCA Cupcake day. All you need to do is register, bake some delicious cupcakes, (like the ones I have made here!) and raise some much-needed funds for those saints at the RSPCA.

What could be more awesome than baking some delicious cupcakes and raising money for a important cause AND EATING THEM! Can you show me the downside? No! Cos there isn't one!

The fun thing about these cupcakes is that you can eat them...and your dog can eat them too! Bake these Honey and Peanut Butter cupcakes, then sit down and share one with your dog! How much fun is that? And then whip another bunch and sell them at your work or your school or invite some people over and have a fundraising puppy cupcake party!

Head on over to www.rspcacupcakeday.com.au and register. Print out some posters and get all your friends and family involved and raise as much money as you can for RSPCA! And enjoy these photos of the puppy picnic I put on for Stompypants and Puca. They were such ladies.

Honey and Peanut Butter Puppy Cakes
These cupcakes are safe for your dog to eat, but please be treat-wise. Dogs don't need sugar. For this reason, these cupcakes are smaller in size. Top with dog treats for the doggies and a rice marshmallow crispy for you!
Prep time: 60 mins

Cooking time: 15 mins
Total time:  75 mins

Servings: 24 small cupcakes

Honey Cupcakes
125g butter, softened 
125g caster sugar
3 tablespoons honey
2 whole eggs plus 3egg yolks (reserve the whites)
1 1/4 cups plain flour, sifted 
1 teaspoon baking powder 
1/2 cup lactose-free milk

Peanut Butter Filling
3 tablespoons sugar free peanut butter
3 tablespoons cream cheese, room temperature
2 tablespoons honey

Meringue Icing
3 egg whites
1/2 cup caster sugar


  1. Preheat the oven to 160°C and line a 12-hole cupcake tin with smaller cupcake liners
  2. Beat the sugar and butter together until lighter in colour
  3. Add eggs and yolk one at a time, beating well after each addition.
  4. Sift the flours into one bowl and add to the creamed mixture alternately with the milk, in three lots, starting and finishing with the flour
  5. Fill each cupcake liner two-thirds full
  6. Bake for 23 minutes.
  7. Meanwhile, add the peanut butter, cream cheese and honey to a small bowl and stir thoroughly to make the peanut butter filling.
  8. Allow to cool while you prepare the meringue. 
Meringue

  1. Wipe a mixer bowl with a paper towel dampened with lemon juice.
  2. Add egg whites to the bowl and whip until soft peaks form.
  3. With the mixer running, gradually add the sugar mixture and beat until thick and glossy.

Assembly
  1. Scoop out a small amount of the cupcakes with a teaspoon or a melon baller. Put the bit aside.
  2. Fill cavity with a generous teaspoon of peanut butter filling.
  3. Replace the cut-out cupcake piece.
  4. Pipe or spoon on the meringue on each cupcake and pass a kitchen blowtorch over the meringue is toasted. Alternatively, place the cupcakes back into a 200°C oven until golden.

Saturday, 7 May 2016

Mothers Day Pound Cake

Warm and comforting, this is a dense and moist cake that is easy to make and even easier to eat - whip one up to impress your mum with your baking skills or just make one to have with ice cream all for yourself!

Perhaps it is my Alabamian ancestry - my mother moved from Alabama to Australia when she was a teen - but every now and then, I get a hankering for some real down-home Southern cooking. Sometimes I'll need to brew up some iced tea (the stuff you get in the plastic bottles is NOT iced tea), other times the air will be aromatic with spices of proper buttermilk fried chicken but today, it was pound cake.

Traditionally, a pound cake was made with a pound each of four ingredients: Butter, sugar, flour and eggs in a ratio of 1:1:1:1. Four pounds of ingredients is 1.8 kilos...that's a big cake! And this version doesn't shy away from those epic proportions.

The eggs must be beaten well after each addition as there is no rising agents in the recipe. The air whipped in to the cake act as a natural leavening. So make sure the butter is whipped til the butter turns a lighter shade of yellow and each eggs is beaten in well before the next is added.

This cake is a dream to make, it's so easy! It's perfect for those of us who want to whip up a cake for their mum. This cake looks great with a generous sprinkle of icing sugar or a simple glaze. I actually can not tell you which version I like better, with icing sugar or glaze. I think the simplicity of the icing sugar is appealing and of course, so easy but I also like the look of glaze dripping through the channels created by a bundt tin. Either option MUST be served with ice cream though - not negotiable.

Oh and that's the other thing I love about this cake. Cracking out the old bundt tin! I love a cake that can be made ornate and decorated by the shape of the pan! My tin is pretty boring, I should upgrade it.

Not least influenced by the scene in My Big Fat Greek Wedding, the bundt also allows for a little creativity with decorations. Some pretty flowers in the centre certainly adds to the prettiness that is Mothers Day.  

At any rate, this is the perfect mothers day cake. And as a bonus, if you have a standard sized cake, there is going to be a touch of batter left over which can be made in to cupcakes! A cake for mum and a treat for you too!

Mothers Day Pound Cake
Adapted from The Complete Southern Cookbook recipe

Prep time: 15 mins

Cooking time: 1 hr 30 mins
Total time:  1 hr 45 mins

Servings: 12 servings

Vanilla Pound Cake
450g butter, softened
3 cups caster sugar
6 eggs, free range
4 cups plain flour, sifted
3/4 cup milk
1 teaspoon vanilla extract

Lemon Glaze - Optional
1 1/2 cups sifted icing sugar
1 tablespoon milk
1 tablespoon melted butter
2 tablespoons lemon juice
  1. Preheat oven to 150°C
  2. Generously grease a bundt tin and dust with flour.
  3. Place the butter in the bowl of a stand mixer and beat on medium speed for 5 minutes, or until butter has turned pale.
  4. With the mixer on low speed, gradually add sugar.
  5. Add eggs, one at a time, beating well after each addition with the mixer on medium speed.
  6. Add the flour alternately with the milk, beginning and ending with the flour.
  7. Add vanilla and mix until combined.
  8. Pour the mixture into the prepared tin, until the mix reaches half an inch or so from the top.
  9. Bake for 1 hour and 30 mins or until the cake is golden and a wooden skewer inserted in to the centre of the cake comes out clean.
  10. Cool for 10 minutes in the pan, then turn on to a wire rack to cool.
  11. Top with icing sugar or with lemon glaze.
  12. To make glaze, place icing sugar, milk and butter in a bowl and whisk vigorously. Add lemon juice and whisk until combined. Drizzle over cooled cake as desired.
  13. Serve with ice cream.


Saturday, 12 March 2016

Sky High Mud Cake with Party Pink Icing

Four layers of dense and fudgy chocolate mud cake, covered in sweet Swiss Meringue Buttercream and topped with luscious, rich chocolate ganache drips and outlandish decorations. 
Sky High Mud Cake Cassie Cakes Recipe
Happy birthday! Party time!
I've always loved birthdays and never understood why people didn't. What's not to love? Everyone wishes you well, people give you presents,  calories agree not to count as their present to you and...there's cake. Any day that you get to have cake is a good day.
Sky High Mud Cake Cassie Cakes Recipe
Those Smarties didn't find their way on to the cake...but they did find their way into my tummy.
And, in part, my love of birthdays comes from my mum. The other parts of my love for comes from cake and presents, but a big chunk is from mum. My mum likes birthdays and Christmas because she's awesome. And what does an awesome mum need on her birthday? An awesome big pink cake, just for her!
Sky High Mud Cake Cassie Cakes Recipe
Lush cake mix.
We have a go-to chocolate cake for birthdays in our family, but once in a while it's time to do something different. So I decided to make a mud cake. I wanted to make it stacked to the sky so the firmness of a mud cake was well suited.
Sky High Mud Cake Cassie Cakes Recipe
I could happily drown in this.
I decided to use Swiss Meringue Buttercream to get the cleanest line possible on the side of the cake. I coloured it bright pink because it looks awesome. This cake is all about awesome. Because my mum is awesome.
Sky High Mud Cake Cassie Cakes Recipe
This marbled chocolate is so easy and looks so cool.
I'll stop using the word 'awesome' now.
Sky High Mud Cake Cassie Cakes Recipe
I definitely poured too much chocolate on top, trying to take photos.
But, this cake is OTT. Inspired in no small way by the cake legend Katherine Sabbath, I decorated the top with bits of broken meringue, silver and pink cachous, dripping chocolate ganache and marbled chocolate shards.
Sky High Mud Cake Cassie Cakes Recipe
Ta-da!
Oh, and French macarons!
Sky High Mud Cake Cassie Cakes Recipe
A spacescape of sweets.
I think it's a spectacular looking treat, however it couldn't be easier! Mud cake doesn't require any creaming of sugar and butter, it's dense and fudgy quality comes from melting the butter and chocolate together in a pan (with a few other ingredients), then beating in some eggs and the flour. This recipe also has sour cream in it which makes it especially moist.
Sky High Mud Cake Cassie Cakes Recipe
Cool card, huh.
You know, why do people hate the word moist so much? I'm so tired of hearing how gross it is. It's just a word! Annnyyywwwaaaayyy...
Sky High Mud Cake Cassie Cakes Recipe
Drippy and awesome. Oh shit, I said awesome again.
Once the cakes have been baked, trim the excess and then halve each layer to create 4 even sized cakes. For this cake and the OTT styling, I decided to use a Swiss Meringue Buttercream. The consistency of SMB is smooth and great for tall cakes.
Sky High Mud Cake Cassie Cakes Recipe
More is more.
Then it was about the toppings. I decided to buy some macarons and store bought meringue kisses along with some coloured cachous. I marbled some dark chocolate with some white chocolate that I coloured using oil-based colouring and cut shards to place atop the cake.
Sky High Mud Cake Cassie Cakes Recipe
Those are water balloons blown up. So cute.
And then, get creative. The great thing about this look is that imperfect and asymmetric decorations actually add to the look. Have a bit of fun and remember more is more!
Sky High Mud Cake Cassie Cakes Recipe
Birthdays are THE BEST!


Sky High Mud Cake with Party Pink Icing
Cake adapted from Bakers Corner
For clear instructions on making Swiss Meringue Buttercream, I always recommend Sweetapolita's fantastic post

Prep time: 30 mins


Cooking time: 90 mins

Total time:  2 hrs 

Servings: 12 very large servings

Chocolate Mud Cake

400g dark chocolate, chopped
400g butter, chopped
2 ½ cups (550g) brown sugar
1 cup (250mL) hot water
2 teaspoons instant coffee
1 cup (100g) cocoa
6 eggs, lightly beaten
300g sour cream
3 cups (450g) plain flour
1 cup (150g) self-raising flour

Chocolate Ganache
300g dark chocolate

350ml heavy cream

Swiss Meringue Buttercream
7 large (225g) egg whites, free range 
1 ½ cups (375g) caster sugar
2 ½ cups (510g) butter, cut into 2cm cubes - should be cool, not cold. Take butter out of fridge 10 -15 minutes before required.
2 teaspoons vanilla extract
Pink gel food colouring


Marbled Chocolate
300g dark chocolate
150g white chocolatePink oil-based food colouring

Various toppings eg macarons, coloured jimmies, cachous, sprinkles, smarties

Chocolate Mud Cake
  1. Preheat oven to 140ºC.
  2. Grease and line two 20cm/8 inch round cake pans.
  3. Add dark chocolate, butter, sugar, water, instant coffee and cocoa in a large saucepan over low heat. Stir until mixture is smooth and chocolate has melted.
  4. Cool 10 minutes then transfer mixture to a large bowl.
  5. Meanwhile, combine eggs and sour cream in a separate bowl then add to the cooled chocolate mixture and stir to combine
  6. Sift both flours into the chocolate mixture then stir to combine.
  7. Divide mixture evenly among prepared pans.
  8. Bake cakes on same shelf in preheated over for 90 minutes or until a skewer inserted into the centre of cake comes out mostly clean - there may be a little moist cake mixture on theskewer, this is normal for mud cake – do not overcook.
  9. Stand cakes in pans 15 minutes to cool slightly, before transferring the cakes to wire racks to cool completely.
  10. Use a serrated knife to trim and split each cake in half.
Dark Chocolate Ganache
  1. Melt the chocolate in a large microwave proof bowl in the microwave in 30 second intervals.
  2. Once melted, add cream and stir to combine until smooth.
  3. Allow to cool slightly. Ganache should be pourable but not hot.
  4. Set aside until required.

Swiss Meringue Butter Cream


    1. Wipe out the metal bowl of stand mixer with a paper towel moistened with lemon juice to ensure the bowl is grease free.
    2. Add egg whites and sugar, and simmer over a pot of rapidly simmering water, whisking gently until temperature reaches 60°C or until sugar is dissolved.
    3. Take the bowl off the heat and put onto stand mixer. Whip on a medium speed until the egg whites have cooled to room temperature. This will take 8 - 10 minutes, or more. Do not add butter until bowl is neutral to the touch.
    4. Switch over to paddle attachment and with mixer on low speed add butter cubes one by one in 30 second intervals until all butter has been added. 
    5. If the mixture becomes lumpy and looks like scrambled eggs, do not panic. Keep mixing on a low speed and the mix will come together and become smooth. 
    6. Add vanilla and a small amount of pink food colouring to reach desired base shade.
    7. Set aside until required.
    Marbled Chocolate


      1. Line a baking sheet with baking paper.
      2. Melt white and dark chocolate in small, microwave proof bowls, 30 seconds at a time for each bowl.
      3. Once chocolate is smooth, add colouring to white chocolate til desired colour is achieved.
      4. Pour dark chocolate over prepared sheet, then add now pink chocolate in random places on top of the dark chocolate, then drag a metal skewer through the chocolates to create a marble effect.
      5. Sprinkle crushed meringues and cachous over chocolate.
      6. Once chocolate has cooled, cut into shards with a sharp knife.
      Assembly
      1. Place one of the layers on a cake board, using a dab of Swiss meringue buttercream to adhere the cake to the board.
      2. Spread approximately 1 cup of SMB on top of the cake and smooth the icing til even and smooth then place second layer of cake on top.
      3. Repeat til all cakes are layered
      4. Add approximately 1 cup of SMB on top and spread until the entire cake is covered in a thin layer of SMB; the crumb coat.
      5. Place in the fridge for 30 minutes.
      6. Remove cake from fridge and add a thicker layer of icing and smooth using cake scrapers and offset spatulas. Continue adding layers of icing to cake til SMB is very smooth.
      7. Slowly pour ganache on top of cake; using a small offset spatula, tease the ganache into long drips over the sides of the cake til desired look is achieved.
      8. Decorate top of cake with macarons, marbled chocolate, crushed meringues and sprinkles.


        Powered by Blogger
        Design byJasmineJoy