Showing posts with label Christmas. Show all posts

Saturday, 16 December 2017

Chocolate Orange Shortbread with Candied Orange Peel

A delicious buttery biscuit, spiked with fragrant orange zest, generously dipped in dark chocolate. Perfect to give as a homemade gift!

Cassie Cakes - Choc Orange Shortbread with candied orange peel

There's something about baking and Christmas. I wish I could say it was because of the weather, that the snow and dropping mercury drives one in to the kitchen for baking and comfort by the oven but in Australia, this is quite the opposite. It's hotter the devil's bumhole after curry night. I can barely function in this heat. And yet when the tree goes up and the shop fronts put their little animatronic scenes up, I get the hankering for some bakering.


Cassie Cakes - Choc Orange Shortbread with candied orange peel


Mr. Cakes has always been a fan of choc orange. Not to say that he came out of the womb sucking on a Jaffa but for as long as I've known him, he's been a fan of this classic combination. It wasn't a flavour I've previously been inclined to choose. However, in the last few years, I've certainly come around. Maybe I'm a mature person now who likes to munch on a Terry's Chocolate Orange while I'm watching a bit of Miss Marple.

Cassie Cakes - Choc Orange Shortbread with candied orange peel

I have never had a Terry's Chocolate Orange and I have never seen Miss Marple. Both are awesome, I'm sure.
Cassie Cakes - Choc Orange Shortbread with candied orange peel

I have had chocolate orange shortbread with candied orange peel. These smell so good, you can out your Christmas candle back in the cabinet for the afternoon while these are baking. Ain't no party like an olfactory party cos an olfactory party is in your nose...and you know...what other party is in your nose? Cocaine.

Cassie Cakes - Choc Orange Shortbread with candied orange peel

These cookies have a wonderful orange flavour from both some orange zest and a few tablespoons of freshly squeezed juice. But because the juice does thin the batter out, the cookies do spread when baked. To counter this, make sure to refrigerate the cookies for 30 minutes.

Cassie Cakes - Choc Orange Shortbread with candied orange peel

I choose to make these in half moon shapes, like orange slices. I tried cutting them before they were put in to the oven, but I found I could get a crisper line on the sliced side if I carefully cut them with a very sharp knife the second they came out of the oven.

Cassie Cakes - Choc Orange Shortbread with candied orange peel

You may be tempted to skip making the candied orange peel and who am I to discourage cutting corners. But I must tell you, the candied orange peel not only look darling and take presentation of the cookies to the next level, but they taste divine. And if giving these as gifts, then I'm afraid the candied peel is really not optional. It just looks (and tastes) too good.

Cassie Cakes - Choc Orange Shortbread with candied orange peel


Chocolate Orange Shortbread with Candied Orange Peel

Prep time: 40 mins
Cooking time: 25 mins
Total time:  1 hr 5 mins

Servings: 24 cut-out biscuits

230g butter, softened
120g caster sugar
2T fresh orange juice
Zest of 2 oranges
260g plain flour
80g rice flour
375 dark chocolate

1.      Preheat oven to 150°C and line two cookie sheets with baking paper
2.      In a large bowl, beat the butter with a wooden spoon until soft then add the sugar and mix thoroughly.
3.      Add orange juice, orange zest then mix.
4.      Sift in both flours and mix to a smooth dough.
5.      Roll out dough to 1cm thickness and cut using a round cookie cutter.
6.      Place on the prepared cookie sheets, at least 2cm apart and place in the fridge to chill for at 30 minutes.
7.      Meanwhile, make the candied orange peel - see below for 
8.      Bake each tray on the middle shelf of the oven for 25 minutes, or until cookies are just cooked.
9.      When the cookies have come straight out of the oven, cut the circles, with a very sharp knife, to form half-moons.
10.  Allow to cool.
11.  Melt the chocolate in a heatproof bowl, in the microwave in 30 second intervals.
12.  Dip each cookie in the melted chocolate and top with a piece of candied orange peel while chocolate is wet and then place on a rack to allow to dry.
13.  Enjoy!
Candied Orange Peel

1/3 cup caster sugar
1/3 cup water
2 oranges
Extra caster sugar for coating peels (1/2 cup to a cup)

1.      Use a vegetable peeler to cut the peel off the oranges in long strips, then use a sharp knife to cut the peel into pieces 3 - 5 cm long.
2.      Combine the sugar and water in a small saucepan over medium heat and stir until the sugar dissolves.
3.      Add the orange peel and cook over a low-medium heat for 20 or so mins until the peel is tender and the syrup thickens.
4.      Transfer the peel and syrup to a small bowl and refrigerate until cool enough to handle.
5.      To sugar the candied orange peel, drain the syrup from the orange peel and toss the peel with the extra caster sugar in a small bowl, then place on a baking sheet lined with non-stick paper.
6.      Allow to stand until required.               

Friday, 23 December 2016

Yule Log Cake


A very traditional, very pretty and very easy Christmas dessert. The Yule Log - a light and airy chocolate sponge with chocolate buttercream presented in a festive log shape.
Cassie Cakes Yule Log
These little reindeer are the essence of Christmas. Think about it/
One of the most satisfying thing to bake is something that is really easy but comes out looking quite complicated and impresses everyone very much. You get to sit back and say, "oh no, it really was very easy" but no one believes you and you look like a flipping baking juggernaut. This Yule Log is one of those things.
Cassie Cakes Yule Log

Like all good things, this cake has it origins in France with popularity in most French colonies such as French Canada and Belgium, and it's French name is bûche de Noël. If my French tutor ever comes back from wherever she went, maybe I'll be able to correctly pronounce that one day. Why would she leave me at Christmas time? It's like she went out to get some des clopes and never came back.

Here's a few process photos of the stages of the cake mix.
Cassie Cakes Yule Log

Cassie Cakes Yule Log

Cassie Cakes Yule Log

Cassie Cakes Yule Log

Anyway, the cake! It's a dream. Besides the separating of the eggs, it's all very straight forward. It's a simple thin sponge cake, a Swiss roll, if you will and you will have to if you want to make this so lets not get caught up in semantics. The sticking point is the roll component of the Swiss roll, since you've already got the Swiss part down. I saw you running nude from the sauna to the plunge pool so I know you do. Exhilarating.
Cassie Cakes Yule Log
They see me rollin'

Cassie Cakes Yule Log
A cake full of promise.
Cassie Cakes Yule Log
Taking form now...
Cassie Cakes Yule Log
Annndddd taaaaa...
But don't let the rolling intimidate you. I rolled it and I can't roll a thing to save me, not even des clopes. And any cracks that do appear in your roll, can be covered by luscious, forgiving buttercream.
Cassie Cakes Yule Log
...DA!
Bake this deceptively easy cake and let is be the centrepiece of your Christmas table. Unless you're eating outside in Australia, where it is literately hotter than the devils asshole, in which case you might want to leave it somewhere cool until the big reveal. God this country is so hot.


Cassie Cakes Yule Log
A peaceful snowy landscape.
Sometimes I look forward to the nuclear winter that President Trump is sure to bring upon us all...anyway, MERRY CHRISTMAS! 

Cassie Cakes Yule Log
hey there little fella.


Yule Log Cake

Prep time: 20 mins, not including cooling time
Cooking time: 20 mins

Total time:  40 mins


Servings: 12 slices


Chocolate Sponge
6 eggs, separated
150 grams caster sugar
1 teaspoon vanilla extract
½ cup grams cocoa powder
Icing sugar to sieve over cake
Chocolate Buttercream
200g chocolate melts
250g icing sugar
250g butter, softened
1 tablespoon vanilla extract
  1. Preheat the oven to 180°C.
  2. In the bowl of a stand mixer, whisk egg whites til thick and stiffened. Once egg whites have reached firm peak stage, sprinkle in 50g of the caster sugar and whisk until just combined.
  3. In another bowl, whisk the egg yolks, vanilla and the remaining caster sugar until the yolks change colour and become pale and thick. Sieve the cocoa powder over, then gently fold in.
  4. Add a large spoonful of egg whites into the yolk mix and fold. Add the remaining egg whites and fold through. Folding them in carefully to keep the air in the mix.
  5. Line a Swiss roll tin with baking paper with a few inches over hanging at the ends. Pour in the cake mixture and bake in the oven for 20 minutes. Let the cake cool a little before turning it out onto another piece of baking paper. Cover loosely with a clean tea towel.
  6. In the meantime, melt the chocolate in the microwave in 30 second intervals and allow to cool. Sieve the icing sugar into a bowl and add butter and vanilla. Beat until butter is paler in colour then add cooled chocolate and beat until smooth and combined.
  7. Trim the edges of the Swiss roll then spread ½ cup to 1 cup of buttercream on to the cake and spread in a thin layer, ensuring the buttercream is spread right to the edges.  
  8. Start rolling from the short side facing you, taking care to get a tight roll from the beginning, and roll up to the other side. Use the tension of the baking paper to press the roll, avoiding pressing your fingers in to the cake and leaving indents.
  9. Cut both ends at an angle, reserving the remnants, and place the Swiss roll on a board or long dish. Fashion the cut offs to make branches sticking off the main log. You may have to unroll and re-roll to the look right.
  10. Spread the remaining buttercream over the cake and use a skewer or fork tines to make indents in the buttercream, to look like bark.   
  11. Finally, dust the whole cake with a generous amount of icing sugar ‘snow’.


Friday, 9 December 2016

Reindeer Cupcakes

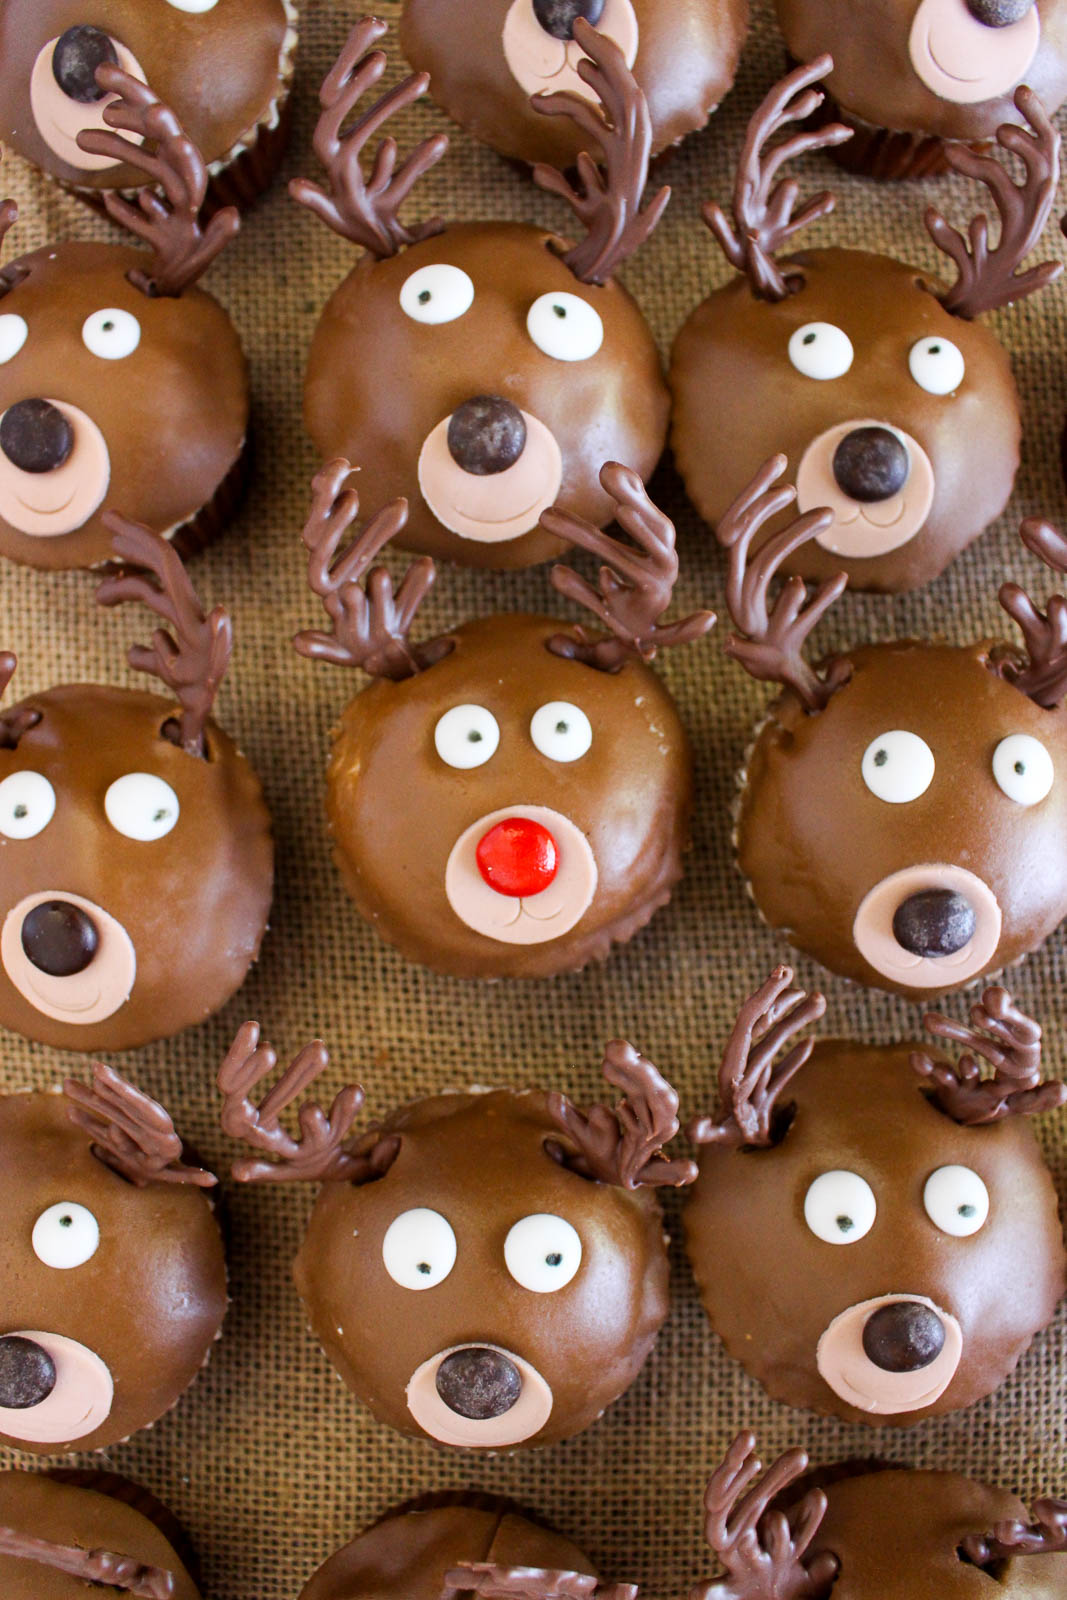
These sweet little faces are almost too cute to eat. A carrot cupcake topped with cute decorations to make a festive party treat!
Reindeer Cupcakes Cassie Cakes

My Christmas baking is running a little behind due to the celebrating starting early. Hangovers make baking seem like a mammoth task...or a reindeer task? But Christmas is important and Santa waits for no one.
Reindeer Cupcakes Cassie Cakes

And these are cute as hell. You know I can't stop saying "as hell". I finish every sentence where I want to be emphatic with it. "That's rude as hell!", "That's pretty as hell!",  "I'm confused as hell!" And my favourite, "That's DUMB as HELL!" Try it. You won't be able to stop.
Reindeer Cupcakes Cassie Cakes

Reindeer Cupcakes Cassie Cakes

Reindeer Cupcakes Cassie Cakes

But do you know what, these are as cute as hell. Of course they're perfect for Christmas but...okay I can't think of any other time of year they'd suit. But that doesn't mean they're any less cute! Perhaps somehow they could be made in to bunnies for Easter. Bunnies like carrots too.
Reindeer Cupcakes Cassie Cakes

So anyway. These darling little cupcakes are carrot cupcakes! Do you know why? Cos what do you leave out for Santa and his reindeer? Carrots, that's what! How twee is that! Carrot cupcakes with reindeer faces! Cute central. If you put 'cute central' into Google Maps, your address will come up with these guys in your kitchen.

Here are some step by step photos for the fondant work.

Reindeer Cupcakes Cassie Cakes
Select a round cutter a little larger than your cupcake.
Knead together white and pre-coloured brown fondant to make a darker shade and lighter shade of brown. Keep the fondant tightly wrapped when not working with the fondant.
Ice the cupcake with buttercream to a slightly domed shape.
Cut a round of darker brown fondant.

Reindeer Cupcakes Cassie Cakes
Lightly press the large over the buttercream.
Using the back of a piping tip, cut a smaller circle from the lighter brown fondant and attach to the darker brown with a tiny dab of buttercream.
Lightly press the edge of the piping tip in to the light brown circle to make the mouth of the deer.
Attach a dark brown M&M to the light brown circle to make the nose of the deer, then add the premade eyes.

Reindeer Cupcakes Cassie Cakes

There is a bit of fondant work with this but it's basically the easiest fondant use ever. Rolling and cutting circles. You'll need two shades of brown for these cupcakes. I purchased pre-coloured brown fondant the colour I wanted to the head of the reindeer to be and then I created the lighter brown by rolling some white fondant in to a bit of the darker fondant. This was easier than buying only white and colouring it. Less mess, less fuss and more consistent results.
Reindeer Cupcakes Cassie Cakes

I used my old standby cupcake recipe and altered it a bit by adding carrots, vegetable oil and some pulverized walnuts. A lot of carrot cupcake recipes out in the great big world seemed more like muffins. They were dense and didn't have the height of a light and fluffy traditional cupcake. Being the Dr. Frankenstein that I am, I simply altered a vanilla cupcake. And it worked.
Reindeer Cupcakes Cassie Cakes

The reindeer also have cute little eye which I made by piping royal icing. I can't tell you how sick of piping icing I was by the end of this, this made far more than I needed. However, once the discs are well dried, you can store them in an airtight container for other projects. To create the pupils, I dotted the discs with a food safe pen. I purchased a specific food pen for this but since making them, I've read that you can use a non-toxic pen purchased from the supermarket, the type kids use for their colouring books.
Reindeer Cupcakes Cassie Cakes

Finally, you will just need to pipe the antlers with some melted chocolate. You can use this template or freestyle it if you've got a steady hand. Make sure you pipe the base of the antlers nice and thick, I found the thinner ones broke easily. To make the chocolate antlers easier to use, make sure they're cold from the fridge and use a small knife to make an incision in the fondant first, then stick the chocolate antlers in.
Reindeer Cupcakes Cassie Cakes

Also, cos it's Christmas, enjoy these photos of my own little reindeer.

Reindeer Cupcakes Cassie Cakes

Reindeer Cupcakes Cassie Cakes

Reindeer Cupcakes Cassie Cakes

Reindeer Cupcakes Cassie Cakes


Reindeer Face Carrot Cupcakes
*Royal icing eyes need time to set so make at least 24 hours in advance. Royal icing eyes can be made well in advance and kept in an airtight container once completely dried.

Prep time: 60 mins, not including drying time

Cooking time: 20 mins

Total time:  1 hr and 20 mins
Servings: 18 cupcakes

Royal Icing Eyes

2 egg whites

1 1/3 cups confectioners sugar, sifted

Black food safe pen
  1. Combine the egg white and sugar in a medium bowl and beat on medium speed for 4-5 minutes, scraping down sides as necessary.
  2. Beat til icing is a thick but pipeable consistency, like molten lava. Add water if the icing is too thick or more sifted icing sugar if too thin
  3. Add the frosting to a piping bag with a small round tip
  4. Lay a large piece of baking paper on to a baking sheet and pipe small circles to make an eye shape.
  5. Allow to dry at room temperature for at least 24 hours before removing from baking sheet. Once dry, dot each eye with the black pen to make an pupil.
Chocolate Antlers
150g chocolate melts

  1. Print out the template and place on a baking sheet. Lay a piece of baking paper over the top.
  2. Melt the chocolate in 30 second intervals until completely melted.
  3. Add melted chocolate into a piping bag fitted with a fine piping tip and pipe antlers on to baking paper, following pattern as on the template. Use a skewer or toothpick to move chocolate in to the gaps as required.
  4. Allow to dry and chill in fridge.


Carrot Cupcakes
110g softened butter
230g caster sugar
2 eggs, free range
150g plain cake flour
125g self-raising cake flour

1 teaspoon cinnamon
1/2 freshly grated nutmeg
1 teaspoon vanilla extract
2 tablespoons vegetable oil
1/2 cup milk
1 cup freshly grated carrots
125g crumbled walnuts
  1. Preheat the oven to 160°C and line a 12-hole cupcake tin.
  2. Beat the sugar and butter together until lighter in colour.
  3. Add eggs one at a time, beating well after each addition.
  4. Sift the flours into one bowl and stir the cinnamon and nutmeg into the flour.
  5. Add the vanilla extract and vegetable oil into the milk.
  6. Add to the creamed mixture alternately with the milk, in three lots, starting and finishing with the flour.
  7. Gently fold the grated carrot and walnuts into the batter until combined.
  8. Fill each cupcake liner two-thirds full, or about 50g on scales.
  9. Bake for 20 to 23 minutes, leave in the tin for 5 minutes then turn on to a rack to cool. 
Vanilla Buttercream

1 cup butter, at room temperature

2 cups icing sugar
1 tablespoon vanilla extract
2 tablespoons milk

  1. Using the whisk attachment of a stand mixer, whip the butter on medium-high speed for 5 minutes, scraping down the sides of the bowl as required.
  2. Reduce the speed to low and gradually add the icing sugar. Once all of the sugar is incorporated, increase the speed to medium-high and add the vanilla and milk, mixing until incorporated. Whip at medium-high speed until light and fluffy, about 2 minutes, scraping the bowl as needed.


Assembly
Pre-coloured brown and white fondant
Colours will vary, use as much fondant as required.
Brown and red M&M's
  1. Ice each cupcake with vanilla buttercream and set aside.
  2. Dust a rolling mat or benchtop with icing sugar.
  3. Knead white fondant into pre-coloured brown fondant to create a dark brown colour for the reindeers face.
  4. Using a little more white fondant, make a lighter brown colour for the reindeers muzzle.
  5. Dust more icing sugar onto bench as required and roll out the dark brown fondant.
  6. Use a circle cutter to cut a circle at a time. Cover remaining fondant with plastic wrap when not in use.
  7. Gently work the circle on to a cupcake. Repeat until all cupcakes have fondant applied.
  8. Roll out the lighter brown colour and use the larger end of a piping tip to cut smaller circles.
  9. Use a dab of buttercream to attach the lighter brown circle to the face of the reindeer, then use the piping tip to lightly indent a mouth into the lighter brown circle. Repeat for all cupcakes.
  10. Using a tiny dab of buttercream, attach an M&M to each reindeers face and a pair of royal icing eyes.
  11. Finally, push a pair of chocolate antlers into each of the cupcakes.

Wednesday, 16 December 2015

Food Gifts Three Ways

Food Gifts Secret Santa Cassie Cakes
Food gifts to giveaway but make sure you keep some for yourself!
My goodness, we just seem to be hurtling towards the big day now aren't we! With less than 10 days to go, you may be well in to your Christmas shopping with hardly anything left to get or maybe you haven't even started! In either case, these three food gifts may be just the thing for gifting to friends and family. And since they are all mail-friendly, they might be just the thing for those a little further away.

Last Christmas, I was scrolling through my Instagram feed and came upon the hashtag '#foodiesecretsanta' - a fantastic food swapped organised by the Brisbane based blogger Claire from Claire K Creations. I signed up at the first chance I got! And I am so glad I did! There is few things more fun in the world than coming home to find a surprise package waiting for you. And it's even more fun when you can eat it! I've received two of my three gifts from my Foodie Secret Santa's, check out my Instagram for the photos. I haven't seen my reciepents get theirs yet but I'm so excited to hear how they like them.

So here are the three foodie gifts that I sent...


Food Gifts Secret Santa Cassie Cakes
Sweet, creamy eggnog fudge.
Fudge with big eggnog flavours! Cinnamon, nutmeg, vanilla and creamy, sweet eggnog. This fudge is easy, made easier with the help of marshmallows to stabilize it. Because of the high proportion of sugar, fudge will withstand being mailed and will keep for two weeks in the fridge.

Eggnog Fudge

Prep time: 10 mins

Cooking time: 15 mins
Total time:  25 mins

Servings: 50 pieces of fudge 

2 cups caster sugar

150ml thickened cream
125g butter, cut in to pieces
¾ cup eggnog
200g white chocolate melts
200g white marshmallows
1 tablespoon spiced rum
1 teaspoon nutmeg - approximately 1/2 a fresh nutmeg
1 teaspoon cinnamon

  1. Line a 30cm x 20cm tin with baking paper
  2. In a large, heavy based pan, place the sugar, cream, butter and eggnog and melt over a medium-high heat until butter is melted and sugar is dissolved.
  3. Use a sugar thermometer, bring the sugar mixture to the soft ball stage - 118°C-120°C/235° F-240° F. This can take some time, stay with it and wait patiently.
  4. Once it has reached soft ball stage, turn the heat down to low.
  5. Add the white chocolate and marshmallows and stir with a wooden spoon. The marshmallows will take some time to melt down.
  6. When the marshmallows have begun to melt, turn heat off.
  7. Add the rum, nutmeg and cinnamon and continue to stir until the marshmallows have completely melted.
  8. Pour mixture in to prepared pan and grate over extra nutmeg and sprinkle with extra cinnamon.
  9. Refrigerate overnight.
  10. Cut fudge into small pieces and wrap with vellum or baking paper.
Food Gifts Secret Santa Cassie Cakes
Homemade Nutella
Who can resist the combination of hazelnuts and chocolate! This is a chocolate lovers dream. You will be on the top of your friends nice list when you give them a jar full of delicious Chocolate Hazelnut spread!

Chocolate Hazelnut Spread - Homemade Nutella
Prep time: 10 mins
Cooking time: 10 mins
Total time:  20 mins

Servings: 2 cups

250g whole hazelnuts
400g milk chocolate melts
3 - 4 tablespoons vegetable oil
50g icing sugar
2 tablespoons cocoa
1 teaspoon vanilla extract

  1. Preheat oven to 160°C and line a cookie sheet with baking paper
  2. Add hazelnuts to tray and bake for 10 minutes until skins have blistered.
  3. Place the hazelnuts in a tea towel and roll gently to remove the hazelnut skins. Allow to cool.
  4. Melt the chocolate in short intervals in the microwave, or over a double boiler, until completely melted and smooth.
  5. Place the cooled, skinned hazelnuts in to the bowl of a food processor and process until they form a paste.
  6. Add vegetable oil, icing sugar, cocoa and vanilla and pulse until thoroughly mixed.
  7. Add the melted chocolate and process until desired smoothness is achieved. Add more oil if necessary.
  8. Add hazelnut spread to jars and seal.

Food Gifts Secret Santa Cassie Cakes
Crunchy and delicious!
The American treat gets an Australian makeover with Macadamia brittle. Ludicrously simple and ridiculously delicious, add to ice cream for a taste sensation or enjoy on it's own!

Macadamia Brittle
Prep time: 10 mins
Cooking time: 20 mins
Total time:  30 mins

Servings: 2 large trays

500g raw whole macadamia nuts
500g caster sugar
125ml water
100g butter, chopped

  1. Preheat oven to 160°C and line 2 cookie sheets with baking paper 
  2. Add macadamia nuts to one tray and bake in the over until nuts are just turning golden.
  3. Allow nuts to cool and roughly chop. Divide the nuts between the two prepared trays and spread evenly.
  4. Place sugar and water in a large, heavy based pan and melt over a medium high heat until the sugar is dissolved.
  5. Cook the mix without stirring for 5 - 10 minutes until the sugar has turned golden.
  6. Turn off the heat and add butter, swirling pan to melt.
  7. Pour half the sugar mix over the macadamias on one tray then the other half over the nuts on the second tray.
  8. Allow to set, then break into portions.
Food Gifts Secret Santa Cassie Cakes
Merry Christmas!


Visit Four Weeks of Christmas Baking past!:2015
Week 1: Chocolate Dipped Vanilla Shortbread
Week 2: Bauble Macarons

2014
Week 1: Christmas Star Cherry Tart with Cinnamon Honey Roasted Macadamia Ice Cream
Week 2: Raspberry Jam Drops
Week 3: Rum Ball Trifle
Week 4: Eggnog Cake
Powered by Blogger
Design byJasmineJoy