Showing posts with label sugar art. Show all posts

Friday, 9 December 2016

Reindeer Cupcakes

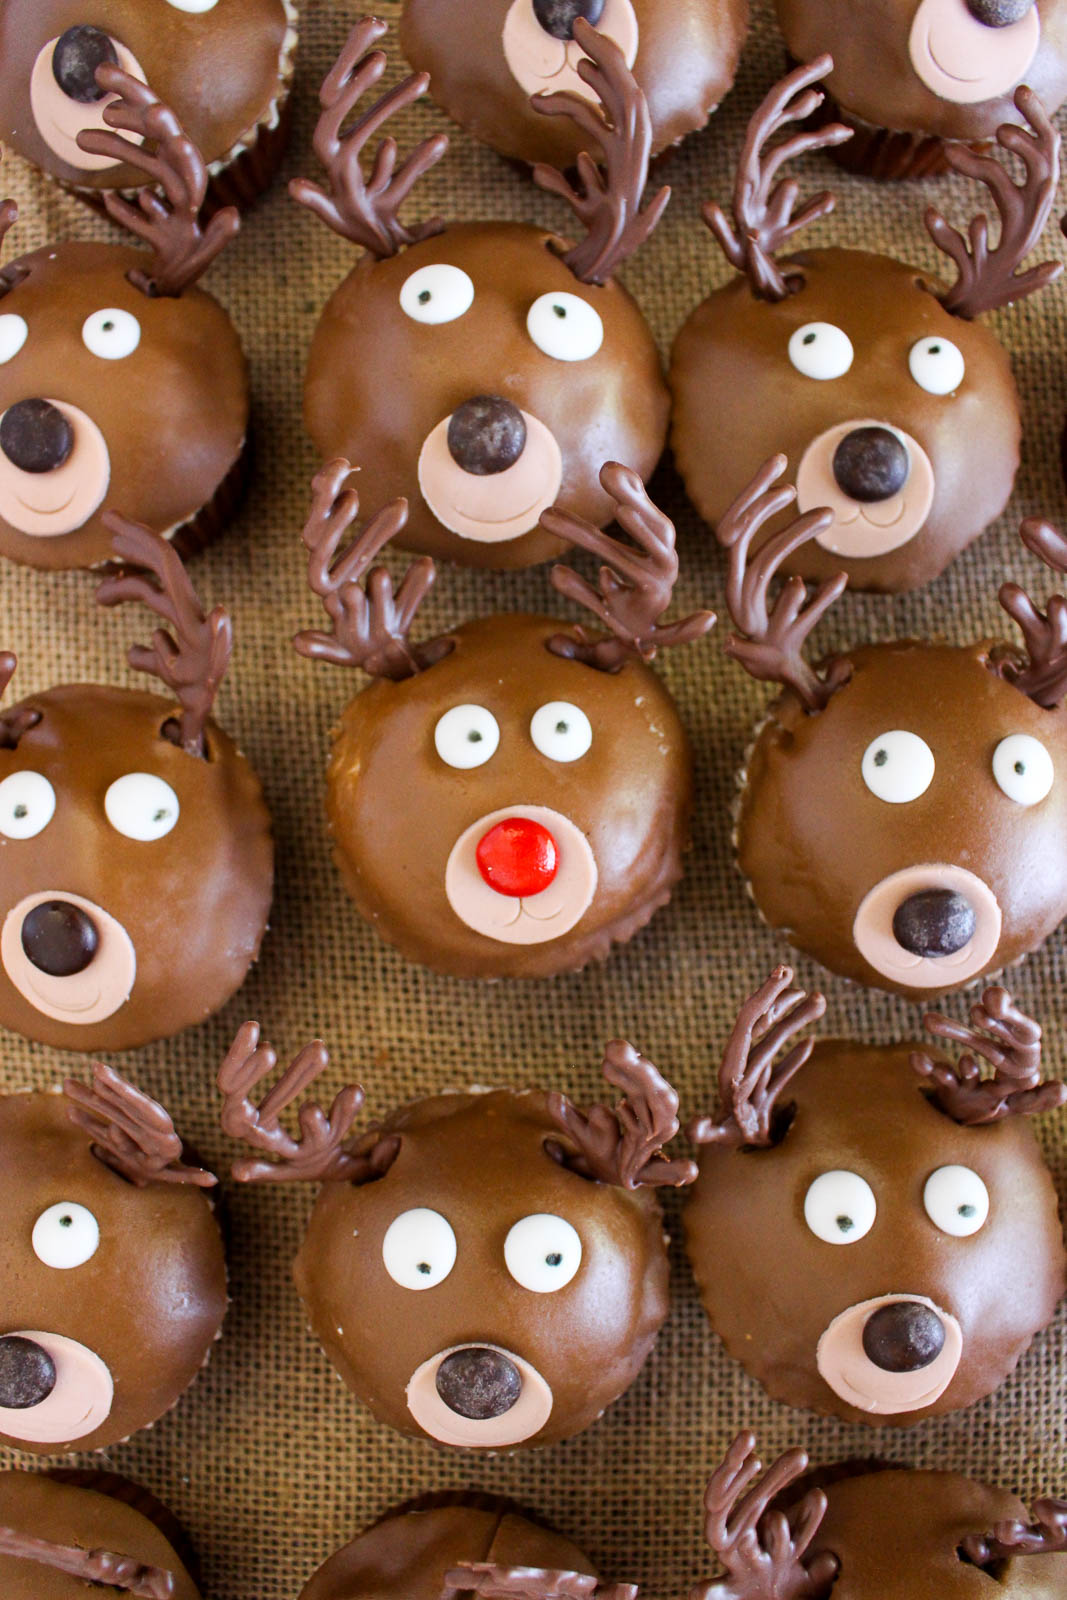
These sweet little faces are almost too cute to eat. A carrot cupcake topped with cute decorations to make a festive party treat!
Reindeer Cupcakes Cassie Cakes

My Christmas baking is running a little behind due to the celebrating starting early. Hangovers make baking seem like a mammoth task...or a reindeer task? But Christmas is important and Santa waits for no one.
Reindeer Cupcakes Cassie Cakes

And these are cute as hell. You know I can't stop saying "as hell". I finish every sentence where I want to be emphatic with it. "That's rude as hell!", "That's pretty as hell!",  "I'm confused as hell!" And my favourite, "That's DUMB as HELL!" Try it. You won't be able to stop.
Reindeer Cupcakes Cassie Cakes

Reindeer Cupcakes Cassie Cakes

Reindeer Cupcakes Cassie Cakes

But do you know what, these are as cute as hell. Of course they're perfect for Christmas but...okay I can't think of any other time of year they'd suit. But that doesn't mean they're any less cute! Perhaps somehow they could be made in to bunnies for Easter. Bunnies like carrots too.
Reindeer Cupcakes Cassie Cakes

So anyway. These darling little cupcakes are carrot cupcakes! Do you know why? Cos what do you leave out for Santa and his reindeer? Carrots, that's what! How twee is that! Carrot cupcakes with reindeer faces! Cute central. If you put 'cute central' into Google Maps, your address will come up with these guys in your kitchen.

Here are some step by step photos for the fondant work.

Reindeer Cupcakes Cassie Cakes
Select a round cutter a little larger than your cupcake.
Knead together white and pre-coloured brown fondant to make a darker shade and lighter shade of brown. Keep the fondant tightly wrapped when not working with the fondant.
Ice the cupcake with buttercream to a slightly domed shape.
Cut a round of darker brown fondant.

Reindeer Cupcakes Cassie Cakes
Lightly press the large over the buttercream.
Using the back of a piping tip, cut a smaller circle from the lighter brown fondant and attach to the darker brown with a tiny dab of buttercream.
Lightly press the edge of the piping tip in to the light brown circle to make the mouth of the deer.
Attach a dark brown M&M to the light brown circle to make the nose of the deer, then add the premade eyes.

Reindeer Cupcakes Cassie Cakes

There is a bit of fondant work with this but it's basically the easiest fondant use ever. Rolling and cutting circles. You'll need two shades of brown for these cupcakes. I purchased pre-coloured brown fondant the colour I wanted to the head of the reindeer to be and then I created the lighter brown by rolling some white fondant in to a bit of the darker fondant. This was easier than buying only white and colouring it. Less mess, less fuss and more consistent results.
Reindeer Cupcakes Cassie Cakes

I used my old standby cupcake recipe and altered it a bit by adding carrots, vegetable oil and some pulverized walnuts. A lot of carrot cupcake recipes out in the great big world seemed more like muffins. They were dense and didn't have the height of a light and fluffy traditional cupcake. Being the Dr. Frankenstein that I am, I simply altered a vanilla cupcake. And it worked.
Reindeer Cupcakes Cassie Cakes

The reindeer also have cute little eye which I made by piping royal icing. I can't tell you how sick of piping icing I was by the end of this, this made far more than I needed. However, once the discs are well dried, you can store them in an airtight container for other projects. To create the pupils, I dotted the discs with a food safe pen. I purchased a specific food pen for this but since making them, I've read that you can use a non-toxic pen purchased from the supermarket, the type kids use for their colouring books.
Reindeer Cupcakes Cassie Cakes

Finally, you will just need to pipe the antlers with some melted chocolate. You can use this template or freestyle it if you've got a steady hand. Make sure you pipe the base of the antlers nice and thick, I found the thinner ones broke easily. To make the chocolate antlers easier to use, make sure they're cold from the fridge and use a small knife to make an incision in the fondant first, then stick the chocolate antlers in.
Reindeer Cupcakes Cassie Cakes

Also, cos it's Christmas, enjoy these photos of my own little reindeer.

Reindeer Cupcakes Cassie Cakes

Reindeer Cupcakes Cassie Cakes

Reindeer Cupcakes Cassie Cakes

Reindeer Cupcakes Cassie Cakes


Reindeer Face Carrot Cupcakes
*Royal icing eyes need time to set so make at least 24 hours in advance. Royal icing eyes can be made well in advance and kept in an airtight container once completely dried.

Prep time: 60 mins, not including drying time

Cooking time: 20 mins

Total time:  1 hr and 20 mins
Servings: 18 cupcakes

Royal Icing Eyes

2 egg whites

1 1/3 cups confectioners sugar, sifted

Black food safe pen
  1. Combine the egg white and sugar in a medium bowl and beat on medium speed for 4-5 minutes, scraping down sides as necessary.
  2. Beat til icing is a thick but pipeable consistency, like molten lava. Add water if the icing is too thick or more sifted icing sugar if too thin
  3. Add the frosting to a piping bag with a small round tip
  4. Lay a large piece of baking paper on to a baking sheet and pipe small circles to make an eye shape.
  5. Allow to dry at room temperature for at least 24 hours before removing from baking sheet. Once dry, dot each eye with the black pen to make an pupil.
Chocolate Antlers
150g chocolate melts

  1. Print out the template and place on a baking sheet. Lay a piece of baking paper over the top.
  2. Melt the chocolate in 30 second intervals until completely melted.
  3. Add melted chocolate into a piping bag fitted with a fine piping tip and pipe antlers on to baking paper, following pattern as on the template. Use a skewer or toothpick to move chocolate in to the gaps as required.
  4. Allow to dry and chill in fridge.


Carrot Cupcakes
110g softened butter
230g caster sugar
2 eggs, free range
150g plain cake flour
125g self-raising cake flour

1 teaspoon cinnamon
1/2 freshly grated nutmeg
1 teaspoon vanilla extract
2 tablespoons vegetable oil
1/2 cup milk
1 cup freshly grated carrots
125g crumbled walnuts
  1. Preheat the oven to 160°C and line a 12-hole cupcake tin.
  2. Beat the sugar and butter together until lighter in colour.
  3. Add eggs one at a time, beating well after each addition.
  4. Sift the flours into one bowl and stir the cinnamon and nutmeg into the flour.
  5. Add the vanilla extract and vegetable oil into the milk.
  6. Add to the creamed mixture alternately with the milk, in three lots, starting and finishing with the flour.
  7. Gently fold the grated carrot and walnuts into the batter until combined.
  8. Fill each cupcake liner two-thirds full, or about 50g on scales.
  9. Bake for 20 to 23 minutes, leave in the tin for 5 minutes then turn on to a rack to cool. 
Vanilla Buttercream

1 cup butter, at room temperature

2 cups icing sugar
1 tablespoon vanilla extract
2 tablespoons milk

  1. Using the whisk attachment of a stand mixer, whip the butter on medium-high speed for 5 minutes, scraping down the sides of the bowl as required.
  2. Reduce the speed to low and gradually add the icing sugar. Once all of the sugar is incorporated, increase the speed to medium-high and add the vanilla and milk, mixing until incorporated. Whip at medium-high speed until light and fluffy, about 2 minutes, scraping the bowl as needed.


Assembly
Pre-coloured brown and white fondant
Colours will vary, use as much fondant as required.
Brown and red M&M's
  1. Ice each cupcake with vanilla buttercream and set aside.
  2. Dust a rolling mat or benchtop with icing sugar.
  3. Knead white fondant into pre-coloured brown fondant to create a dark brown colour for the reindeers face.
  4. Using a little more white fondant, make a lighter brown colour for the reindeers muzzle.
  5. Dust more icing sugar onto bench as required and roll out the dark brown fondant.
  6. Use a circle cutter to cut a circle at a time. Cover remaining fondant with plastic wrap when not in use.
  7. Gently work the circle on to a cupcake. Repeat until all cupcakes have fondant applied.
  8. Roll out the lighter brown colour and use the larger end of a piping tip to cut smaller circles.
  9. Use a dab of buttercream to attach the lighter brown circle to the face of the reindeer, then use the piping tip to lightly indent a mouth into the lighter brown circle. Repeat for all cupcakes.
  10. Using a tiny dab of buttercream, attach an M&M to each reindeers face and a pair of royal icing eyes.
  11. Finally, push a pair of chocolate antlers into each of the cupcakes.

Saturday, 27 June 2015

Pink Bubble Strawberry Butter Cake

Pink Bubble Strawberry Butter Cake...a delightfully pink ombré cake topped with pink bubbles. Buttery, filled with strawberry compote and whipped vanilla cream, this cake evokes birthday parties and celebrations...
Cassie Cakes Pink Bubble Strawberry Butter Cake

This cake was pretty exciting to make. It was a cake of firsts. The first cake I photographed with my brand new camera. The first time I made gelatine bubbles. My first ombré cake. And I think that's all the firsts but 3 firsts is still very impressive for one cake. I started dreaming of a very pink cake a few weeks ago when my sister had her baby girl. I thought a pink cake was in order to celebrate. But then, why should I start pushing gender conformity on a 5 week old baby? We'll just have to set that aside and embrace the pinkness for now...cos it's SO PRETTY! Look at the pinkness! YAY!
Cassie Cakes Pink Bubble Strawberry Butter Cake

I've called this the Pink Bubble Strawberry Butter Cake. My go-to vanilla cake is usually an adaption of the amazing Sweetapolita's vanilla cake but this time, I wanted a buttery, dense cake which would stay firm and soak up the strawberry compote I was planning on filling the cake with. So I used a very traditional butter cake recipe, which would have enough firmness to soak up liquid while being stacked high. It's a lovely simple cake that suits many different icings and uses.
Cassie Cakes Pink Bubble Strawberry Butter Cake

Now to the really fun and messy bit! These gelatine bubbles were so much fun to make and really easy. They need 24 hours to dry so make sure you start them a day or two before. You could even do them a week in advance and store them in a dry, air tight container. As long as you don't get them wet, they could really survive indefinitely. And just a note that although they are technically edible, they would be really gross to eat.
Cassie Cakes Pink Bubble Strawberry Butter Cake

To make the bubbles, blow up some water balloons of varying sizes. I found that to make them really round, blow to the desired size then twist the "stem" of the balloon really tight, pushing the air to the other end and tie them tight. Pierce the excess plastic with a skewer and push the other end into a sponge, so that the balloons are suspended above your bench, not coming into contact with each other. 
Cassie Cakes Pink Bubble Strawberry Butter Cake

Then mix up your gelatine mixture. I'll put really detailed instructions below but basically, the ratio is two parts water to one part powdered gelatine. For this many bubbles, I used 6 tablespoons of water and 3 tablespoons of gelatine. After you've coloured the gelatine, let it set and then microwaved the geltain, dip your balloons in the mixture. For my bubbles, I dipped some once and some twice. The more you dip them, the darker they'll be.
Cassie Cakes Pink Bubble Strawberry Butter Cake

Don't worry if the under side of your bubbles are a bit mess, they'll be sitting on the cake and I found i had to trim those bits off to get them to sit flat anyway. Just try to make the upper-side as smooth as possible. Even then, one of my favourite bubble had a ripple through it from not being dipped smoothly enough. Imperfections can be the best...there's a lesson for my niece to learn! 

The next day, pop the balloons and peel them away from the bubble. This bit was really fun. 

Then it's on to the cake, filling and icing! 

Cassie Cakes Pink Bubble Strawberry Butter Cake
And because this is a celebration cake, it deserves a special icing. I decided to make a vanilla Swiss meringue buttercream. Many people prefer this SMBC over regular buttercream, however real buttercream with tonnes of icing sugar and butter will never be usurped in my heart. But SMBC is a lovely icing and a real skill to add to your baking repertoire. It's more stable and can withstand a hotter day then traditional buttercream. Lots of people use it for wedding cakes in Australia where our days can get so warm. It's also got a lighter texture and can be a little easier to get smoother finish on your cake. 
Cassie Cakes Pink Bubble Strawberry Butter Cake

The cake is filled with fresh strawberry compote and a good dollop of whipped cream. I wanted the cake to evoke strawberry shortcake. Even though I've never had proper strawberry shortcakes...I think I'll need to have a go at that soon. The whipped cream has a little gelatine in it to stabilise it, it need to hold it's own under 5 layers of dense cake!
The cake is really easy. I did find it domed quite a bit, even with bake even strips so you might need to do a little trimming to get the cake layers nice and flat. But then you get to eat the trimmings so really not that bad of a deal. 
Cassie Cakes Pink Bubble Strawberry Butter Cake

The icing is a little different to traditional buttercream. You start by placing the egg whites and sugar in a heatproof bowl. As the whites and sugar get whipped after they're heated, I just use my metal KitchenAid bowl. Heat the egg whites and sugar over a rapidly simmers pot of water, gently whisking constantly, til they reach 60°C/140°F on candy thermometer or until there are no grains of sugar left. You need to make sure you are whisking constantly, otherwise you'll end up with really sweet scrambled eggs.
Cassie Cakes Pink Bubble Strawberry Butter Cake

After this, whip the egg whites with a whisk attachment of a stand mixer, or with handheld beaters. They need to whisked until they return to room temperature, around 8-10 minute. Once the whites and bowl are neutral to the touch, add bits of cool - not soft - butter in 30 second intervals until all mixed. Then the Swiss meringue buttercream is ready! This whole process can be a little intimidating but once you have it, it's really easy. Like a lot of things in life! Another lesson for baby! But if you're having troubles, the ever amazing Sweetapolita has the best and clearest step by step to follow. I strongly encourage you to go have a read of them if it's your first time making SMBC.
Cassie Cakes Pink Bubble Strawberry Butter Cake

After you've made the icing and trimmed your layers, stack them on top of each other, filling each layer with cream and strawberry compote...
Cassie Cakes Pink Bubble Strawberry Butter Cake

Now we've assembled the cake, it's time to start the ombré icing. I started by tinting the whole lot of the icing a base pink shade. I then used this to do a crumb coat over the whole cake, making sure the cream dam was reinforced by SMBC. Put the cake in the fridge to firm up for 30 minutes. 
Cassie Cakes Pink Bubble Strawberry Butter Cake

In the meantime, split your remaining SMBC into 3 lots and tint them to the desired shades. Remember, add a little icing at a time. It's easy to add more, not so easy to take away. 

Once the cake is firm and you're happy with your icing shades, it's time to ombré! Add the darkest icing on the bottom third of the cake...
Cassie Cakes Pink Bubble Strawberry Butter Cake

...the medium colour on the middle of the cake...
Cassie Cakes Pink Bubble Strawberry Butter Cake

...and the lightest colour on the top third and top of the cake. 
Cassie Cakes Pink Bubble Strawberry Butter Cake

This is where having a turntable comes in handy. Mine is cheap and has warped but it shouldn't matter too much as long as it spins. Spin the cake around and around, holding a bench scraper perpendicular to the cake. As you spin and smooth the cake, the layers will blend and become ombré. So pretty! 
Cassie Cakes Pink Bubble Strawberry Butter Cake

Top with the bubbles. I used a mix of pink and silver cachous to fill in the gaps.

Cassie Cakes Pink Bubble Strawberry Butter Cake

And there you have it! A wonderful Pink Bubble Strawberry Butter Cake!


Cassie Cakes Pink Bubble Strawberry Butter Cake

Perfect for a birthday party or just because


Cassie Cakes Pink Bubble Strawberry Butter Cake


How sweet do the water balloons look blown up...

Cassie Cakes Pink Bubble Strawberry Butter Cake

Cassie Cakes Pink Bubble Strawberry Butter Cake

I'm already thinking of the cake I'll make for baby's first birthday.


Cassie Cakes Pink Bubble Strawberry Butter Cake


Cassie Cakes Pink Bubble Strawberry Butter Cake

I'm loving the new camera by the way. I think there's a lot to learn with food photography and I'm so excited to jump in!
Cassie Cakes Pink Bubble Strawberry Butter Cake

Yummy, sweet, buttery...
Cassie Cakes Pink Bubble Strawberry Butter Cake

And one more cos I just LOVE my new camera!
Cassie Cakes Pink Bubble Strawberry Butter Cake

Pink Bubble Strawberry Butter Cake

*Make gelatine bubbles at least 24 hours before required to ensure adequate drying time

*To ensure even layers, weigh your mixing bowl before beginning cake mix. This will make it possible for you to subtract the weight of the bowl from the total weight once the cake batter has been made and allow you to divide the batter into fifths. 

Prep time: 140 mins plus drying time

Cooking time: 90 mins
Total time:  3 hr 50 mins 
Servings: 12

Gelatine Bubbles

Water ballons
Wooden skewers
Large sponge
Vegetable oil
3 tablespoons powdered gelatine
6 tablespoons cold water
Pink gel food colouring


  1. Fill 10 - 20 water balloons with air, inflating to various sizes. Pinch and twist opening of balloon to push the air down to the end of the balloon to ensure a round shape.
  2. Pierce the excess end of the balloon with a wooden skewer and push into a sponge to ensure that the balloons are not touching to ground or each other.
  3. One by one, rub the outside of the balloons with a tiny amount of vegetable oil. Wipe the excess off the balloons with a paper towel.
  4. In a small microwave proof bowl, mix together the gelatine, water and food colouring. Allow to absorb for 5 minutes.
  5. Heat the gelatine mix in the microwave in 10 second intervals until the geltaine is melted and the mix is smooth.
  6. Allow to cool slightly then holding the balloon by the know, dip each balloon in the gelatine until the balloon is mostly covered.
  7. After all balloons have been dipped, dip about half of the balloons again to darken the colour.
  8. Allow balloons to dry overnight.
  9. Once the balloons are dry, pierce the balloon and deflate the balloon inside the gelatine. Peel away the balloon and trim the gelatine bubbles to sit flat.
  10. Store in an airtight container til required.

Butter Cake
375g butter, softened
3 cups caster sugar
6 eggs, free range
1 1/2 teaspooons vanilla extract
4 1/2 cups plain flour
1 teaspoons baking powder
1 teaspoon bicarbonate soda
1/2 teaspoon salt
1 1/2 cups buttermilk

Swiss Meringue Buttercream
7 large/225g egg whites, free range 
1 1/2 cups/375g caster sugar
2 1/2 cups/510g butter, cut into 2cm cubes - should be cool, not cold. Take butter out of fridge 10 -15 minutes before required.
2 teaspoons vanilla
Pink gel food colouring

Strawberry Compote
2 cups chopped strawberries
1/2 cup sugar
1 tablespoon lemon juice

Whipped Cream Filling
2 tablespoons cold water
2 tablespoons powdered gelatine
420ml thickened cream
1/4 cup sifted icing sugar
1 teaspoon vanilla

Butter Cake

  1. Preheat oven to 180°C.
  2. Grease two 8 inch/20cm cake tins generously with butter and flour the sides. Line the bases with baking paper
  3. In the bowl of an electric mixer, beat the butter and caster sugar until creamy and lighter in colour.
  4. Add the eggs, one at a time, until each egg is mixed through
  5. Add vanilla and beat until just combined.
  6. In a separate bowl, sift together flour, baking powder, bicarbonate soda and salt.
  7. Add the sifted flour and buttermilk to the butter mix alternately, starting and ending with the flour. Beat on a low speed until just combined.
  8. Using scales, divide the batter into 5 lots and bake the first two cakes for 45 - 50 minutes, or until the tops are golden and a wooden skwer comes out clean when cake is pierced.
  9. Allow cakes to stand in the pans for 10 minutes before turning on to racks to cool.
  10. Clean the cake pans, re-grease and line, then bake next two layers, then the final layer.
  11. Allow cakes to completely cool before trimming as required.
Swiss Meringue Butter Cream
  1. Wipe out the metal bowl of stand mixer with a paper towel moistened with lemon jucie to ensure the bowl is grease free.
  2. Add egg whites and sugar, and simmer over a pot of rapidly simmering water, whisking gently until temperature reaches 60°C or until sugar is dissolved.
  3. Take the bowl off the heat and put onto stand mixer. Whip on a medium speed until the egg whites have cooled to room temperature. This will take 8 - 10 minutes, or more. Do not add butter until bowl is neutral to the touch.
  4. Switch over to paddle attachment and with mixer on low speed add butter cubes one by one in 30 second intervals until all butter has been added. 
  5. If the mixture becomes lumpy and looks like scrambled eggs, do not panic. Keep mixing on a low speed and the mix will come together and become smooth. 
  6. Add vanilla and a small amount of pink food colouring to reach desired base shade.
  7. Set aside until required.
Strawberry Compote

  1. Add chopped strawberries to a medium pan along with sugar and lemon juice.
  2. Simmer gently, til strawberries break down and mix becomes jam like, around 5 - 8 minutes.
  3. Set aside to cool, then refrigerate until required.


 Whipped Cream Filling
  1. Add gelatine to a small bowl and then add cold water. Mix and set aside for 10 minutes.
  2. In a small saucepan, heat 1/2 cup cream until it just begins to simmer then take off the heat and add gelatine. Whisk to combine and then place in fridge.
  3. Keep whisking the gelatine and cream every 2 minutes, placing back into the fridge in between, until the cream reaches a cool temperature.
  4. Whip the remaining cream with icing sugar until soft peaks just begin to form.
  5. Very gradually add the cool gelatine and cream mixture while beating and continue beating until medium-firm peaks form. Once medium peaks being to form, cease beating or cream with turn lumpy. Refrigerate until required.
Assembly
  1. Place one layer of cake onto a cake board, cut side up.
  2. Pipe a layer of the whipped cream filling around the border of the cake to create a "dam" for the strawberry compote,
  3. Spoon 1/4 of the strawberry compote into the cut side of the cake. Add a few random dollops of cream on top of the compote,
  4. Add another layer of cake and repeat with cream and compote. Repeat until all layers are added.
  5. With the Swiss Meringue Buttercream, fill in any gaps between the layers and ensure sides of the cake are straight.
  6. Using a spatula, add a thin layer of Swiss Meringue Buttercream to the outside of the cake, creating a crumb coat over the entire cake.
  7. Refrigerate cake for 30 minutes.
  8. Divide the remaining Swiss Meringue Buttercream into thirds and tint each third desired shade.
  9. Take cake out of the fridge and add the darkest coloured icing to the bottom third of the cake, the medium shade to the middle third and the lightest colour to the top third and top of the cake.
  10. Holding a straight cake scraper, bench scraper or spatula 90 degrees to the cake.
  11. Slowly spin the cake til colours have blended and outside of the cake has reached the desired smoothness. You may need to refrigerate the cake to firm up, to allow pressure to be applied to smooth the cake.
  12. Top with gelatine bubbles and coloured sprinkles. 

Friday, 26 December 2014

Eggnog Cake


A richly spiced, fragrant and delicious cake with vanilla butter cream and a whipped cream and strawberry filling...
Eggnog Cake Cassie Cakes
Eggnog cake
Well, Christmas Day is done and dusted with glitter and my hangover is receding. The Christmas Tree is still shining bright but thoughts of packing it up have begun. Let's all live in the festive season a little longer and enjoy this Eggnog cake for Week 4 of my Four Weeks of Christmas Baking.

Eggnog Cake Cassie Cakes
All the good things.
I can't say that this is the only Eggnog cake on the internet but I do think this is the only one that has this texture - a moist, crumbly crumb that isn't too dense or too light. The only other ones that I have come across have been pound cakes that are quite heavy and closer to a sweet bread rather than cake. They're awesome, no doubt but my version is much more the traditional cake texture.

Eggnog Cake Cassie Cakes
You cut the butter up, you put it in piece by piece, it looks just like damp sand then you add the eggnog! Easy!
The flavours in this cake come from the traditional spices found in eggnog - vanilla, cinnamon, eggs and a touch of ground cloves. Now not all eggnog recipes have cloves in them but some, so it's up to you if you choose to put them in. Personally, I really enjoyed the slight heat and extra spice that the cloves added. It's only a touch too so if you're on the fence, give it a go. I really like the kick it gives the cake and it makes it fragrant and Christmassy. Which is the whole point of this cake.
 

Eggnog Cake Cassie Cakes
All ready to go into the oven with my 'bakeven' strips...highly recommend these strips for a nice even cake.

I used eggnog in this cake which I bought at the supermarket, but you could make your own if you felt like really going all out. There are lots of lovely recipes around. A good use for the leftover eggnog is mixing it with Baileys to drink while your cakes are baking! I got a good four cups in. Extra Christmas cheer and all that.
 

Eggnog Cake Cassie Cakes
Who wants Baileys?

The method in this cake is a little different, and the teaching comes from the most wonderful baker and one of my most favourite sites on the whole wide internet - Sweetapolita. This lady is simply amazing and her site is (along with Nigella's of course) my happy place online.

So this is what the first layer will look like...and the second too, really.

So instead of creaming the sugar and butter together then adding dry ingredients, in the traditional method, this recipe rubs in the butter to the flour of sorts. The first time I tried this method, I failed miserably but on my second attempt, it yielded the moist and fluffy cake that I know and love. So make sure you follow the directions carefully - trust me, you'll be so happy you did.
 
This is what the layers of buttercream may look like:
 

Eggnog Cake Cassie Cakes
You put your first, thin coat of butter cream on, the crumb coat...
 

Eggnog Cake Cassie Cakes
...then you have a Baileys.
 

Eggnog Cake Cassie Cakes
You put your second layer of buttercream on...
 

Eggnog Cake Cassie Cakes
...then you have a Baileys.
 

Eggnog Cake Cassie Cakes
You put your third layer of buttercream on...
 

Eggnog Cake Cassie Cakes
...and then you have a Baileys! YAY!
 
The icing on this cake is a classic buttercream with a cream and strawberry jam filling. I found that the cream and jam broke up the sweetness of the buttercream and was just unbelievable with the eggnog flavours. I'm a fan of putting different fillings in cakes, it's always a lovely surprise.

Eggnog Cake Cassie Cakes
And then all your hard work pays off! Have a Baileys to celebrate!
I decorated this cake with fondant holly leaves and berries that I made a few weeks ago. These are so easy to make and a really great place to start with fondant decorations. You'll need a specific fondant plunger. I won't go into too great detail on how to make them, there are plenty of great tutorials online. If you would like to see how I did it, leave a comment below and if there's enough interest I can do a post but trust me when I say it's fairly straight forward.

Eggnog Cake Cassie Cakes
Pretty.
I love the simplicity of the cake, I love a nice, white cake. Speaking of which, you will not be able to get the icing this white without white colouring which you can get at any cake specialty shop or on eBay. This will make the icing nice and white. If you don't want to buy this, a few drops of red or green would look really pretty too.


Eggnog Cake Cassie Cakes
Awww look at the tree!
So as we finish up with my Four Weeks of Christmas Baking for this year, I hope you had a lovely Christmas and have the most wonderful New Year.

Eggnog Cake Cassie Cakes
Lovely Christmas.


Eggnog Cake Cassie Cakes
Lovely cake! Open up, here come Santa's Sleigh! Choo choo! Choo choo? Yeah, why not.


Eggnog Cake Cassie Cakes
Merry Christmas everyone!

Have a look back at the weeks of Christmas Baking past:

Week 1 of Four Weeks of Christmas Baking: Christmas Star Cherry Tart with Cinnamon Honey Roasted Macadamia Ice Cream
Week 2 of Four Weeks of Christmas Baking: Raspberry Jam Drops
Week 3 of Four Weeks of Christmas Baking: Rum Ball Trifle
 
Eggnog Cake
Adapted from Sweetapolita Strawberry and Lavender Cake

Prep time: 50 mins
Cooking time: 25 mins
Total time:  1 hr 15 mins plus refrigeration time for icing
 
Servings: 12
 
Eggnog cake

4 whole eggs, room temperature
2 egg yolks, room temperature
300ml eggnog, divided
4 teaspoons vanilla extract
3 cups plain cake flour, sifted
1/4 teaspoon ground cloves (optional)
2 teaspoons cinnamon
2 teaspoons ground nutmeg
1 & 1/2 teaspoons baking powder
1 teaspoon bicarbonate soda
2 cups caster sugar
250g butter, cold and cut into small even pieces

 
Vanilla Buttercream
400g soft butter
4 cups (500g) icing sugar
2 teaspoons vanilla extract
60ml cream
White food colouring (optional)
 
Strawberry Jam and Whipped Cream Filling
2 teaspoons powdered gelatine
2 tablespoons cold water
1 & 1/2 cups cream
1/4 icing sugar
250g strawberry jam

2 tablespoons lemon juice
 
Eggnog Cake
 
  1. Preheat oven to 180°C
  2. Grease three 8 inch/20cm cake tins generously with butter and flour the sides. Line the bases with baking paper.
  3. Add the egg yolks, eggs, 60ml of the eggnog and vanilla in a jug with a spout and beat lightly and set aside.
  4. Sift together with flour, ground cloves, cinnamon, nutmeg, baking powder and bicarbonate soda into the bowl of a mixer.
  5. Add sugar and turn to mixer on to a low speed.
  6. Add pieces of butter to the flour with the mixer on low in 10 second intervals until all the butter is added. Mixture should look like damp sand.
  7. Add the remaining 240ml to the mix and beat on a medium speed for 4 minutes.
  8. Scrape sides of bowl then turn the mixer back to a medium speed
  9. Add the egg mixture very gradually to the batter until all the egg mix is added then turn the mixer up to a high speed and mix for 1 minute. Ensure egg is fully combined.
  10. Divide the mixture evenly among the three pans and bake for 25 minutes.
  11. Turn on to wire racks to cool after 5 minutes, remove baking paper and allow to cool completely.
Vanilla Buttercream
 
  1. Add butter to bowl of electric mixer and beat on high for 10 minutes.
  2. Add the icing sugar, cream and vanilla and beat until all combined and smooth.
  3. Add white food colouring and beat until colour is consistent.
  4. Set aside until required.
Strawberry Jam and Whipped Cream Filling
 
  1. Add gelatine to a small bowl and then add cold water. Mix and set aside for 10 minutes.
  2. In a small saucepan, heat 1/2 cup cream until it just begins to simmer then take off the heat and add gelatine. Whisk to combine and then place in fridge.
  3. Keep whisking the gelatine and cream every 2 minutes, placing back into the fridge in between, until the cream reaches a cool temperature.
  4. Whip the remaining 1 cup of cream with icing sugar until soft peaks just begin to form.
  5. Very gradually add the cool gelatine and cream mixture while beating and continue beating until medium-firm peaks form. Once medium peaks being to form, cease beating or cream with turn lumpy.
  6. For jam mixture, add the jam and lemon juice to a small saucepan and place on low heat.
  7. Bring to a gentle simmer and stir for 1 minute.
  8. Decant to a bowl to cool and set aside until required.
Assembly
 
  1. Place first cake on a cake board then pipe 1/2 the cream mixture on top, leaving a 1/2 inch space from the edge of the cake. Create a dam for the jam to go in.
  2. Place half the jam into the prepared area.
  3. Carefully place the second layer on top and repeat cream and jam steps.
  4. Place the last layer on top.
  5. Fill in any gaps in between the layers with buttercream.
  6. Spread a thin layer of buttercream over the entire cake and place into the fridge for 30 - 45 minutes. This is called a crumb coat.
  7. Take the cake out and spread another layer of buttercream onto cake. Repeat as necessary until cake is smooth and completely covered with buttercream.
  8. Decorate as desired.
Powered by Blogger
Design byJasmineJoy