Showing posts with label Brisbane blog. Show all posts

Monday, 2 May 2016

REVIEW: Apples on Ainsworth

Apples on Ainsworth Cassie Cakes Review
An organic café without being obnoxious.
There was a time when doors turned into tables and rickety chairs was just shabby instead of shabby chic. The tides have certainly changed and some of my most favourite cafes (namely the groovy hole in the wall, Southside Tea Room) have adopted this decorating style. There's something comforting about repurposed furniture, old items that otherwise would have been disposed of are given a new life. But in their new life, they bring with them their history and there's a warmth in the history of old things. And there's warmth to this café, Apples on Ainsworth, which comes not only from it's worn and mismatched furniture but from the welcoming staff as well.
Apples on Ainsworth Cassie Cakes Review
These cups of coffee need a pool fence and a CPR poster.
Not far back from Kessels Road, Apples on Ainsworth sits on it's namesake street in suburban Salisbury and I'm not sure I would have found it if it had not been recommended to me by a friend. We met with my parents for a Sunday breakfast. The café was fairly busy, but there was a table (made from a door, of course) available outside in the mild sun.
Apples on Ainsworth Cassie Cakes Review
Looks like someone took a big old sip of my milkshake...that's my trick!
We ordered at the counter and drinks arrived soon after at our door-table. The coffees were big enough to drown in! And they were served in vintage crockery, consistent with the rest of the café. As I did spot that the milkshake flavourings were the old Cottees pump bottles, I went with a chocolate milkshake instead of my favourite breakfast milkshake, trusty caramel. I find that the caramel flavourings out of a bottle tend to be too sweet and don't give the true caramel hit I desire. The chocolate ones are passable though. This milkshake came in a steel canister which is always a good sign, but it had cream on top, which I don't like and I would have liked it if I were asked if I wanted it on there, as I didn't see it stated on the menu. Also, it wasn't filled up all the way, and was a even a fair way from the top. It was okay in flavor though. See where it ranks on the Milkbar!
Apples on Ainsworth Cassie Cakes Review
Me and that toast could be related, we're both pretty pale.
We didn't have to wait long for the meals to come out. The first of the three dishes was the old classic, Bacon & Eggs ($12), a piece of organic sourdough with scrambled eggs, bacon and a side of halloumi ($3). The bacon was blissfully well-done, so often bacon is pale and undercooked, so it was nice to see it cooked through and the fat rendered. The eggs were also well cooked, a yellow, fluffy cloud of morning goodness. The halloumi was a little chewy, it would have fare well with a squeeze of lemon. And although the bacon was well cooked, the toast could have used a minute or two longer in the toaster. But considering the price, it was pretty decent.
Apples on Ainsworth Cassie Cakes Review
Yum. Population: this dish.
I love the current trend of baked or Mediterranean eggs or whatever they want to call the tomato-y medley that is usually served in some sort of earthen ware. And at Apples on Ainsworth, they call is Spanish Eggs ($10), Baked Eggs in a Spanish Salsa mixed with homemade house mix beans & organic mince, served with organic sourdough cheese fingers, with bacon ($3). The toast served with the Spanish Eggs were little solider fingers of toasted cheese sandwich, which was so cute. The side of bacon was generous and also well cooked.
Apples on Ainsworth Cassie Cakes Review
So healthy.
I went with a veggo option, the delightfully named Mushroom Boat ($12), Organic grilled mushrooms served on a bed of spinach with avocado and halloumi topped with a sunny side up egg and dressed with pesto. This was a lovely dish, very fresh and light...maybe too light for my cavernous stomach. If you're anything like me, order a bit of toast on the side. The milkshake did go a fair way to filling to void.
Apples on Ainsworth Cassie Cakes Review
So much stuff.
All in all, Apples on Ainsworth is a suburban gem with great service and decent food. With the authentic vintage feel, the ambience feels like a visit to grandma's kitchen...not my grandmother, her kitchen is rather contemporary but perhaps a TV grandmother or your grandmother or the nice lady down the road who doesn't have any children but is just a really nice, older lady.

Food: 3.5/5Service: 4/5Price: 4/5Atmosphere: 3.5/5

Apples on Ainsworth Menu, Reviews, Photos, Location and Info - Zomato

Wednesday, 16 September 2015

Chocolate Cheesecake Macarons

The classic French macaron. A meringue and almond biscuit with a crisp shell and chewy interior filled with tangy, chocolate cheesecake filling.
Chocolate Cheesecake Macarons Cassie Cakes
So pretty and fRANch. That's how I like to say French sometimes.
Look, I'm not saying I'm Fiona Cairns or Katherine Sabbath...the local bakery with buttercream cupcakes could probably teach me a thing or two. That being said, I do know my way around a KitchenAid and had success making éclairs which are considered challenging by some. But it was with more than a touch of trepidation that I approached the ultimate in temperamental baking - the French Macaron. If I'm totally honest, I have actually been avoiding making them for some time. They seem so hard, so easy to mess up. I've heard that the weather affects them, if it's too hot, too humid, you've got a failure on your hands.

Chocolate Cheesecake Macarons Cassie Cakes
Always amazes me how all these things can come together and make cakes, biscuits, pies...baking is magic.
Something grabbed me in the last few weeks. It was time. Like a bird that knows when to fly south for the winter, I felt it in my waters. It was time to make macarons! I spent days reading about them, trying to find the magic recipe, the magic list of tips and tricks that would make my macaron recipe fool proof.

Chocolate Cheesecake Macarons Cassie Cakes
This is the stiff peak we want. The peak will not fall in on itself. It stays straight and true. The type of meringue where you can hold the bowl upside down over your head and not end up wearing them.

I did discover that many find the "Italian" process easier than the traditional "French" method. The Italian method uses a sugar syrup in place of powdered icing sugar. It produces a more stable batter which is less likely to fail. And do you know what, I almost went that way. I did want to be less likely to fail.
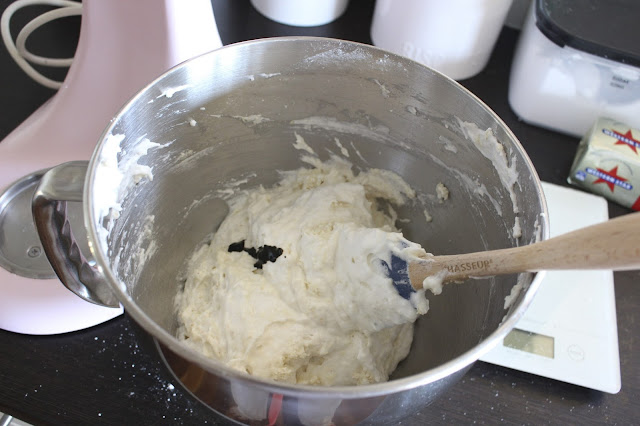
Chocolate Cheesecake Macarons Cassie Cakes
This is the stage that you want but scarily, I forgot to put colour in! I had to give it few more turns, which I did super slowly, like that would trick the batter.

 But if I wasn't doing the classic macaron, it would forever be my white whale. You can neither win nor lose if you don't run the race. I had to do the classic French macaron. I had to know that I could do it! And if I couldn't, I would pull a Jerry - "I choose not to run!" and hide the fact that I couldn't from everyone. Really, would it change my life that much? It's just some bloody biscuits.

Chocolate Cheesecake Macarons Cassie Cakes
Hold the piping bag at 90 degrees to your tray and apply firm and even pressure, pulling the tip up to allow the batter to fill the circle on the template. Thanks to Mr Cakes for taking this photo! What a pro.
The perfect macaron should have a smooth, crisp shell with a slightly chewy, soft interior. The biscuit should have "feet", a ruffled area of a few millimetres where the batter has risen. And it should have a generous but neatly piped filling. This are the minimum standards of a macaron.
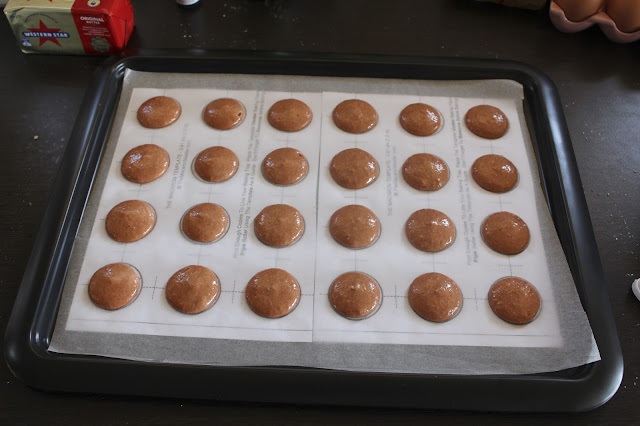
Chocolate Cheesecake Macarons Cassie Cakes
I was not happy with the colour of that food colouring. Baby poo brown.

Chocolate Cheesecake Macarons Cassie Cakes
Also, don't be like me, remember to take the template out from underneath the baking paper before you bake them.
Well, let me tell you, my life has changed. For the better. Because I nailed it.

Chocolate Cheesecake Macarons Cassie Cakes
I can not tell you how pleased I was at this stage. Like I discovered a cure for the common cold.
I made French macarons.
Chocolate Cheesecake Macarons Cassie Cakes
This looks like my favourite emoticon.
And now, my hair is shinier, my skin is glowing, I got a promotion at work, I no longer read celebrity trash websites and I don't have irrational, unexplainable mood swings. None of which is true. But! I can now tell you how I made macarons pretty darn well. And that's life change enough. And guys. If I can do it, you can too!
Chocolate Cheesecake Macarons Cassie Cakes
This looks slightly ominous. Like those macarons in the background might attack these foreground ones.
First tip. Egg whites. Some of the wonderful resources I read, of which there were countless, advised that the egg whites should be old, or aged. This is done by leaving the separated whites in a sealed container in the fridge for a few days. The aged whites are said to whip up better and hold more air. I did not do this. I am not the most patient of people and I wanted to make them today! What I did do and what forms my first tip, is let the eggs come to room temperature. A room temperature egg white beats better than a cold one and a stiff, "dry" meringue is needed. I guess if a room temp egg white whips better than a cold one, maybe an aged one does whip better than fresh...but regardless, I didn't bother. If your impatient like I so often am, submerge the eggs in warm water to bring them to room temperature quicker.
Chocolate Cheesecake Macarons Cassie Cakes
Macarons piled pretty and high.
The second tip I have gathered for you is to sift the icing sugar and the almond meal. Even the store bought almond meal with have some larger pieces in it and for the smoothest shells on your macarons. This will also make the batter lighter, ensuring you have a better chance of your cookies getting as nice foot on them.
Chocolate Cheesecake Macarons Cassie Cakes
That wooden spoon looks so pretty, with a bow in it's hair. Where you off to, Spoon?
Tip 3 might be the most ambiguous and also the most important of the tips. Do not over or under mix the batter. An under-mixed batter will crack and be lumpy. An over-mixed batter will spread when baked and not rise. The tricky thing though is that there is no exact number of turns of the spatula that I can tell you. The batter should have a "lava like" consistency. It should move slowly off your spatula when lifted. Turn the batter gently but firmly with spatula until the almond meal is thoroughly mixed, no more turns. If the batter becomes runny, you've gone too far!
Chocolate Cheesecake Macarons Cassie Cakes
Yum.
 Once you pipe your macarons on to the prepared tray - I used these stencils to ensure they were all the same size - make sure that you bang the tray, very firmly, on the kitchen bench 3 times. Obviously don't hit the tray down so hard that the batter comes flying off but you want to make sure that any air bubbles in the macarons move to the surface so the tops of the shells are smooth.
Chocolate Cheesecake Macarons Cassie Cakes
These macarons are carrying a wounded fellow solider back to the safety of the pile.
Finally, after they have been piped and banged (hmm) it is time for the final tip I have for you. Let the piped uncooked shells sit  on the bench to dry for 30 minutes. The macarons will develop a skin which will prevent the from spreading, which means the only way is up! Baby! For you and me now! And for the macarons.

Chocolate Cheesecake Macarons Cassie Cakes
Little do they know Mr Cakes is coming and safety in numbers will not protect you.
So that's it. That's all I have to tell you. Now it's a matter of getting in that kitchen and baking them frilly little biscuits like a freaking baking warrior! Get in there and bake, you glorious muthalicker!

Chocolate Cheesecake Macarons Cassie Cakes
YAY!

Chocolate Cheesecake Macarons
Use this template  to ensure your macarons are even and consistently sized. Lie the template under baking paper and pipe the batter on. Make sure the template is removed before baking.


Prep time: 20 mins

Cooking time: 15 mins
Total time:  35 mins

Servings: 24 sandwiched macarons

Macarons
3 large egg whites, free range, room temperature
Pinch of salt
1/4 teaspoon cream of tartar
50g caster sugar
200g icing sugar
1 cup/120g almond meal
Brown food colouring
Chocolate sprinkles

Chocolate Cheesecake Buttercream
150g milk chocolate
110g softened butter
110g cream cheese
2 cups icing sugar, sifted
1 teaspoon vanilla extract

Macarons
  1. Preheat oven to 150°C
  2. Using a template to ensure the macarons are evenly sized, line a two trays with baking paper.
  3. Beat egg whites in the bowl of a mixer until egg whites are foamy.
  4. Add pinch of salt and cream of tartar and continue to beat egg whites,
  5. Slowly sprinkle in caster sugar and continue beating for around 8 minutes, until egg whites are stiff, peaks hold and do not collapse.
  6. Add food colouring.
  7. Sift almond meal and icing sugar in to a medium bowl.
  8. Gently add sifted almond meal and icing sugar into the egg white mix.
  9. With a flat spatula, gently and precisely fold the almond meal mix in to the egg whites. Batter should be thick and flow off the spatula - think 'molten lava'.
  10. Pipe macarons using a large piping bag and open round tip.
  11. Once they are all piped, sprinkle with chocolate sprinkles.
  12. Allow piped macarons to sit uncovered on the bench for 30 minutes. A skin will form that feels tacky to the touch and does not leave a fingerprint.
  13. Bake for 18 minutes. Bake one tray at a time, on the same shelf to ensure they are baked evenly.
  14. Remove from oven and allow to cool completely,
Chocolate Cheesecake Buttercream
  1. In a microwave safe bowl, melt chocolate in 30 seconds bursts until completely melted. Set aside to cool slightly.
  2. In the bowl of a mixer, beat butter until creamy.
  3. Add cream cheese, sugar and vanilla and beat until combined and mix is smooth and creamy.
  4. Add melted chocolate and beat well.
To assemble
  1. Once the biscuits are cooled, match each with another of the same size.
  2. Using a round tip fitted on a piping bag, pipe a generous circle of buttercream on one biscuit then sandwich corresponding biscuit, pushing buttercream to edges.
  3. Store in an airtight container.

Saturday, 27 June 2015

Pink Bubble Strawberry Butter Cake

Pink Bubble Strawberry Butter Cake...a delightfully pink ombré cake topped with pink bubbles. Buttery, filled with strawberry compote and whipped vanilla cream, this cake evokes birthday parties and celebrations...
Cassie Cakes Pink Bubble Strawberry Butter Cake

This cake was pretty exciting to make. It was a cake of firsts. The first cake I photographed with my brand new camera. The first time I made gelatine bubbles. My first ombré cake. And I think that's all the firsts but 3 firsts is still very impressive for one cake. I started dreaming of a very pink cake a few weeks ago when my sister had her baby girl. I thought a pink cake was in order to celebrate. But then, why should I start pushing gender conformity on a 5 week old baby? We'll just have to set that aside and embrace the pinkness for now...cos it's SO PRETTY! Look at the pinkness! YAY!
Cassie Cakes Pink Bubble Strawberry Butter Cake

I've called this the Pink Bubble Strawberry Butter Cake. My go-to vanilla cake is usually an adaption of the amazing Sweetapolita's vanilla cake but this time, I wanted a buttery, dense cake which would stay firm and soak up the strawberry compote I was planning on filling the cake with. So I used a very traditional butter cake recipe, which would have enough firmness to soak up liquid while being stacked high. It's a lovely simple cake that suits many different icings and uses.
Cassie Cakes Pink Bubble Strawberry Butter Cake

Now to the really fun and messy bit! These gelatine bubbles were so much fun to make and really easy. They need 24 hours to dry so make sure you start them a day or two before. You could even do them a week in advance and store them in a dry, air tight container. As long as you don't get them wet, they could really survive indefinitely. And just a note that although they are technically edible, they would be really gross to eat.
Cassie Cakes Pink Bubble Strawberry Butter Cake

To make the bubbles, blow up some water balloons of varying sizes. I found that to make them really round, blow to the desired size then twist the "stem" of the balloon really tight, pushing the air to the other end and tie them tight. Pierce the excess plastic with a skewer and push the other end into a sponge, so that the balloons are suspended above your bench, not coming into contact with each other. 
Cassie Cakes Pink Bubble Strawberry Butter Cake

Then mix up your gelatine mixture. I'll put really detailed instructions below but basically, the ratio is two parts water to one part powdered gelatine. For this many bubbles, I used 6 tablespoons of water and 3 tablespoons of gelatine. After you've coloured the gelatine, let it set and then microwaved the geltain, dip your balloons in the mixture. For my bubbles, I dipped some once and some twice. The more you dip them, the darker they'll be.
Cassie Cakes Pink Bubble Strawberry Butter Cake

Don't worry if the under side of your bubbles are a bit mess, they'll be sitting on the cake and I found i had to trim those bits off to get them to sit flat anyway. Just try to make the upper-side as smooth as possible. Even then, one of my favourite bubble had a ripple through it from not being dipped smoothly enough. Imperfections can be the best...there's a lesson for my niece to learn! 

The next day, pop the balloons and peel them away from the bubble. This bit was really fun. 

Then it's on to the cake, filling and icing! 

Cassie Cakes Pink Bubble Strawberry Butter Cake
And because this is a celebration cake, it deserves a special icing. I decided to make a vanilla Swiss meringue buttercream. Many people prefer this SMBC over regular buttercream, however real buttercream with tonnes of icing sugar and butter will never be usurped in my heart. But SMBC is a lovely icing and a real skill to add to your baking repertoire. It's more stable and can withstand a hotter day then traditional buttercream. Lots of people use it for wedding cakes in Australia where our days can get so warm. It's also got a lighter texture and can be a little easier to get smoother finish on your cake. 
Cassie Cakes Pink Bubble Strawberry Butter Cake

The cake is filled with fresh strawberry compote and a good dollop of whipped cream. I wanted the cake to evoke strawberry shortcake. Even though I've never had proper strawberry shortcakes...I think I'll need to have a go at that soon. The whipped cream has a little gelatine in it to stabilise it, it need to hold it's own under 5 layers of dense cake!
The cake is really easy. I did find it domed quite a bit, even with bake even strips so you might need to do a little trimming to get the cake layers nice and flat. But then you get to eat the trimmings so really not that bad of a deal. 
Cassie Cakes Pink Bubble Strawberry Butter Cake

The icing is a little different to traditional buttercream. You start by placing the egg whites and sugar in a heatproof bowl. As the whites and sugar get whipped after they're heated, I just use my metal KitchenAid bowl. Heat the egg whites and sugar over a rapidly simmers pot of water, gently whisking constantly, til they reach 60°C/140°F on candy thermometer or until there are no grains of sugar left. You need to make sure you are whisking constantly, otherwise you'll end up with really sweet scrambled eggs.
Cassie Cakes Pink Bubble Strawberry Butter Cake

After this, whip the egg whites with a whisk attachment of a stand mixer, or with handheld beaters. They need to whisked until they return to room temperature, around 8-10 minute. Once the whites and bowl are neutral to the touch, add bits of cool - not soft - butter in 30 second intervals until all mixed. Then the Swiss meringue buttercream is ready! This whole process can be a little intimidating but once you have it, it's really easy. Like a lot of things in life! Another lesson for baby! But if you're having troubles, the ever amazing Sweetapolita has the best and clearest step by step to follow. I strongly encourage you to go have a read of them if it's your first time making SMBC.
Cassie Cakes Pink Bubble Strawberry Butter Cake

After you've made the icing and trimmed your layers, stack them on top of each other, filling each layer with cream and strawberry compote...
Cassie Cakes Pink Bubble Strawberry Butter Cake

Now we've assembled the cake, it's time to start the ombré icing. I started by tinting the whole lot of the icing a base pink shade. I then used this to do a crumb coat over the whole cake, making sure the cream dam was reinforced by SMBC. Put the cake in the fridge to firm up for 30 minutes. 
Cassie Cakes Pink Bubble Strawberry Butter Cake

In the meantime, split your remaining SMBC into 3 lots and tint them to the desired shades. Remember, add a little icing at a time. It's easy to add more, not so easy to take away. 

Once the cake is firm and you're happy with your icing shades, it's time to ombré! Add the darkest icing on the bottom third of the cake...
Cassie Cakes Pink Bubble Strawberry Butter Cake

...the medium colour on the middle of the cake...
Cassie Cakes Pink Bubble Strawberry Butter Cake

...and the lightest colour on the top third and top of the cake. 
Cassie Cakes Pink Bubble Strawberry Butter Cake

This is where having a turntable comes in handy. Mine is cheap and has warped but it shouldn't matter too much as long as it spins. Spin the cake around and around, holding a bench scraper perpendicular to the cake. As you spin and smooth the cake, the layers will blend and become ombré. So pretty! 
Cassie Cakes Pink Bubble Strawberry Butter Cake

Top with the bubbles. I used a mix of pink and silver cachous to fill in the gaps.

Cassie Cakes Pink Bubble Strawberry Butter Cake

And there you have it! A wonderful Pink Bubble Strawberry Butter Cake!


Cassie Cakes Pink Bubble Strawberry Butter Cake

Perfect for a birthday party or just because


Cassie Cakes Pink Bubble Strawberry Butter Cake


How sweet do the water balloons look blown up...

Cassie Cakes Pink Bubble Strawberry Butter Cake

Cassie Cakes Pink Bubble Strawberry Butter Cake

I'm already thinking of the cake I'll make for baby's first birthday.


Cassie Cakes Pink Bubble Strawberry Butter Cake


Cassie Cakes Pink Bubble Strawberry Butter Cake

I'm loving the new camera by the way. I think there's a lot to learn with food photography and I'm so excited to jump in!
Cassie Cakes Pink Bubble Strawberry Butter Cake

Yummy, sweet, buttery...
Cassie Cakes Pink Bubble Strawberry Butter Cake

And one more cos I just LOVE my new camera!
Cassie Cakes Pink Bubble Strawberry Butter Cake

Pink Bubble Strawberry Butter Cake

*Make gelatine bubbles at least 24 hours before required to ensure adequate drying time

*To ensure even layers, weigh your mixing bowl before beginning cake mix. This will make it possible for you to subtract the weight of the bowl from the total weight once the cake batter has been made and allow you to divide the batter into fifths. 

Prep time: 140 mins plus drying time

Cooking time: 90 mins
Total time:  3 hr 50 mins 
Servings: 12

Gelatine Bubbles

Water ballons
Wooden skewers
Large sponge
Vegetable oil
3 tablespoons powdered gelatine
6 tablespoons cold water
Pink gel food colouring


  1. Fill 10 - 20 water balloons with air, inflating to various sizes. Pinch and twist opening of balloon to push the air down to the end of the balloon to ensure a round shape.
  2. Pierce the excess end of the balloon with a wooden skewer and push into a sponge to ensure that the balloons are not touching to ground or each other.
  3. One by one, rub the outside of the balloons with a tiny amount of vegetable oil. Wipe the excess off the balloons with a paper towel.
  4. In a small microwave proof bowl, mix together the gelatine, water and food colouring. Allow to absorb for 5 minutes.
  5. Heat the gelatine mix in the microwave in 10 second intervals until the geltaine is melted and the mix is smooth.
  6. Allow to cool slightly then holding the balloon by the know, dip each balloon in the gelatine until the balloon is mostly covered.
  7. After all balloons have been dipped, dip about half of the balloons again to darken the colour.
  8. Allow balloons to dry overnight.
  9. Once the balloons are dry, pierce the balloon and deflate the balloon inside the gelatine. Peel away the balloon and trim the gelatine bubbles to sit flat.
  10. Store in an airtight container til required.

Butter Cake
375g butter, softened
3 cups caster sugar
6 eggs, free range
1 1/2 teaspooons vanilla extract
4 1/2 cups plain flour
1 teaspoons baking powder
1 teaspoon bicarbonate soda
1/2 teaspoon salt
1 1/2 cups buttermilk

Swiss Meringue Buttercream
7 large/225g egg whites, free range 
1 1/2 cups/375g caster sugar
2 1/2 cups/510g butter, cut into 2cm cubes - should be cool, not cold. Take butter out of fridge 10 -15 minutes before required.
2 teaspoons vanilla
Pink gel food colouring

Strawberry Compote
2 cups chopped strawberries
1/2 cup sugar
1 tablespoon lemon juice

Whipped Cream Filling
2 tablespoons cold water
2 tablespoons powdered gelatine
420ml thickened cream
1/4 cup sifted icing sugar
1 teaspoon vanilla

Butter Cake

  1. Preheat oven to 180°C.
  2. Grease two 8 inch/20cm cake tins generously with butter and flour the sides. Line the bases with baking paper
  3. In the bowl of an electric mixer, beat the butter and caster sugar until creamy and lighter in colour.
  4. Add the eggs, one at a time, until each egg is mixed through
  5. Add vanilla and beat until just combined.
  6. In a separate bowl, sift together flour, baking powder, bicarbonate soda and salt.
  7. Add the sifted flour and buttermilk to the butter mix alternately, starting and ending with the flour. Beat on a low speed until just combined.
  8. Using scales, divide the batter into 5 lots and bake the first two cakes for 45 - 50 minutes, or until the tops are golden and a wooden skwer comes out clean when cake is pierced.
  9. Allow cakes to stand in the pans for 10 minutes before turning on to racks to cool.
  10. Clean the cake pans, re-grease and line, then bake next two layers, then the final layer.
  11. Allow cakes to completely cool before trimming as required.
Swiss Meringue Butter Cream
  1. Wipe out the metal bowl of stand mixer with a paper towel moistened with lemon jucie to ensure the bowl is grease free.
  2. Add egg whites and sugar, and simmer over a pot of rapidly simmering water, whisking gently until temperature reaches 60°C or until sugar is dissolved.
  3. Take the bowl off the heat and put onto stand mixer. Whip on a medium speed until the egg whites have cooled to room temperature. This will take 8 - 10 minutes, or more. Do not add butter until bowl is neutral to the touch.
  4. Switch over to paddle attachment and with mixer on low speed add butter cubes one by one in 30 second intervals until all butter has been added. 
  5. If the mixture becomes lumpy and looks like scrambled eggs, do not panic. Keep mixing on a low speed and the mix will come together and become smooth. 
  6. Add vanilla and a small amount of pink food colouring to reach desired base shade.
  7. Set aside until required.
Strawberry Compote

  1. Add chopped strawberries to a medium pan along with sugar and lemon juice.
  2. Simmer gently, til strawberries break down and mix becomes jam like, around 5 - 8 minutes.
  3. Set aside to cool, then refrigerate until required.


 Whipped Cream Filling
  1. Add gelatine to a small bowl and then add cold water. Mix and set aside for 10 minutes.
  2. In a small saucepan, heat 1/2 cup cream until it just begins to simmer then take off the heat and add gelatine. Whisk to combine and then place in fridge.
  3. Keep whisking the gelatine and cream every 2 minutes, placing back into the fridge in between, until the cream reaches a cool temperature.
  4. Whip the remaining cream with icing sugar until soft peaks just begin to form.
  5. Very gradually add the cool gelatine and cream mixture while beating and continue beating until medium-firm peaks form. Once medium peaks being to form, cease beating or cream with turn lumpy. Refrigerate until required.
Assembly
  1. Place one layer of cake onto a cake board, cut side up.
  2. Pipe a layer of the whipped cream filling around the border of the cake to create a "dam" for the strawberry compote,
  3. Spoon 1/4 of the strawberry compote into the cut side of the cake. Add a few random dollops of cream on top of the compote,
  4. Add another layer of cake and repeat with cream and compote. Repeat until all layers are added.
  5. With the Swiss Meringue Buttercream, fill in any gaps between the layers and ensure sides of the cake are straight.
  6. Using a spatula, add a thin layer of Swiss Meringue Buttercream to the outside of the cake, creating a crumb coat over the entire cake.
  7. Refrigerate cake for 30 minutes.
  8. Divide the remaining Swiss Meringue Buttercream into thirds and tint each third desired shade.
  9. Take cake out of the fridge and add the darkest coloured icing to the bottom third of the cake, the medium shade to the middle third and the lightest colour to the top third and top of the cake.
  10. Holding a straight cake scraper, bench scraper or spatula 90 degrees to the cake.
  11. Slowly spin the cake til colours have blended and outside of the cake has reached the desired smoothness. You may need to refrigerate the cake to firm up, to allow pressure to be applied to smooth the cake.
  12. Top with gelatine bubbles and coloured sprinkles. 
Powered by Blogger
Design byJasmineJoy