Friday, 23 December 2016

Yule Log Cake


A very traditional, very pretty and very easy Christmas dessert. The Yule Log - a light and airy chocolate sponge with chocolate buttercream presented in a festive log shape.
Cassie Cakes Yule Log
These little reindeer are the essence of Christmas. Think about it/
One of the most satisfying thing to bake is something that is really easy but comes out looking quite complicated and impresses everyone very much. You get to sit back and say, "oh no, it really was very easy" but no one believes you and you look like a flipping baking juggernaut. This Yule Log is one of those things.
Cassie Cakes Yule Log

Like all good things, this cake has it origins in France with popularity in most French colonies such as French Canada and Belgium, and it's French name is bûche de Noël. If my French tutor ever comes back from wherever she went, maybe I'll be able to correctly pronounce that one day. Why would she leave me at Christmas time? It's like she went out to get some des clopes and never came back.

Here's a few process photos of the stages of the cake mix.
Cassie Cakes Yule Log

Cassie Cakes Yule Log

Cassie Cakes Yule Log

Cassie Cakes Yule Log

Anyway, the cake! It's a dream. Besides the separating of the eggs, it's all very straight forward. It's a simple thin sponge cake, a Swiss roll, if you will and you will have to if you want to make this so lets not get caught up in semantics. The sticking point is the roll component of the Swiss roll, since you've already got the Swiss part down. I saw you running nude from the sauna to the plunge pool so I know you do. Exhilarating.
Cassie Cakes Yule Log
They see me rollin'

Cassie Cakes Yule Log
A cake full of promise.
Cassie Cakes Yule Log
Taking form now...
Cassie Cakes Yule Log
Annndddd taaaaa...
But don't let the rolling intimidate you. I rolled it and I can't roll a thing to save me, not even des clopes. And any cracks that do appear in your roll, can be covered by luscious, forgiving buttercream.
Cassie Cakes Yule Log
...DA!
Bake this deceptively easy cake and let is be the centrepiece of your Christmas table. Unless you're eating outside in Australia, where it is literately hotter than the devils asshole, in which case you might want to leave it somewhere cool until the big reveal. God this country is so hot.


Cassie Cakes Yule Log
A peaceful snowy landscape.
Sometimes I look forward to the nuclear winter that President Trump is sure to bring upon us all...anyway, MERRY CHRISTMAS! 

Cassie Cakes Yule Log
hey there little fella.


Yule Log Cake

Prep time: 20 mins, not including cooling time
Cooking time: 20 mins

Total time:  40 mins


Servings: 12 slices


Chocolate Sponge
6 eggs, separated
150 grams caster sugar
1 teaspoon vanilla extract
½ cup grams cocoa powder
Icing sugar to sieve over cake
Chocolate Buttercream
200g chocolate melts
250g icing sugar
250g butter, softened
1 tablespoon vanilla extract
  1. Preheat the oven to 180°C.
  2. In the bowl of a stand mixer, whisk egg whites til thick and stiffened. Once egg whites have reached firm peak stage, sprinkle in 50g of the caster sugar and whisk until just combined.
  3. In another bowl, whisk the egg yolks, vanilla and the remaining caster sugar until the yolks change colour and become pale and thick. Sieve the cocoa powder over, then gently fold in.
  4. Add a large spoonful of egg whites into the yolk mix and fold. Add the remaining egg whites and fold through. Folding them in carefully to keep the air in the mix.
  5. Line a Swiss roll tin with baking paper with a few inches over hanging at the ends. Pour in the cake mixture and bake in the oven for 20 minutes. Let the cake cool a little before turning it out onto another piece of baking paper. Cover loosely with a clean tea towel.
  6. In the meantime, melt the chocolate in the microwave in 30 second intervals and allow to cool. Sieve the icing sugar into a bowl and add butter and vanilla. Beat until butter is paler in colour then add cooled chocolate and beat until smooth and combined.
  7. Trim the edges of the Swiss roll then spread ½ cup to 1 cup of buttercream on to the cake and spread in a thin layer, ensuring the buttercream is spread right to the edges.  
  8. Start rolling from the short side facing you, taking care to get a tight roll from the beginning, and roll up to the other side. Use the tension of the baking paper to press the roll, avoiding pressing your fingers in to the cake and leaving indents.
  9. Cut both ends at an angle, reserving the remnants, and place the Swiss roll on a board or long dish. Fashion the cut offs to make branches sticking off the main log. You may have to unroll and re-roll to the look right.
  10. Spread the remaining buttercream over the cake and use a skewer or fork tines to make indents in the buttercream, to look like bark.   
  11. Finally, dust the whole cake with a generous amount of icing sugar ‘snow’.


Friday, 9 December 2016

Reindeer Cupcakes

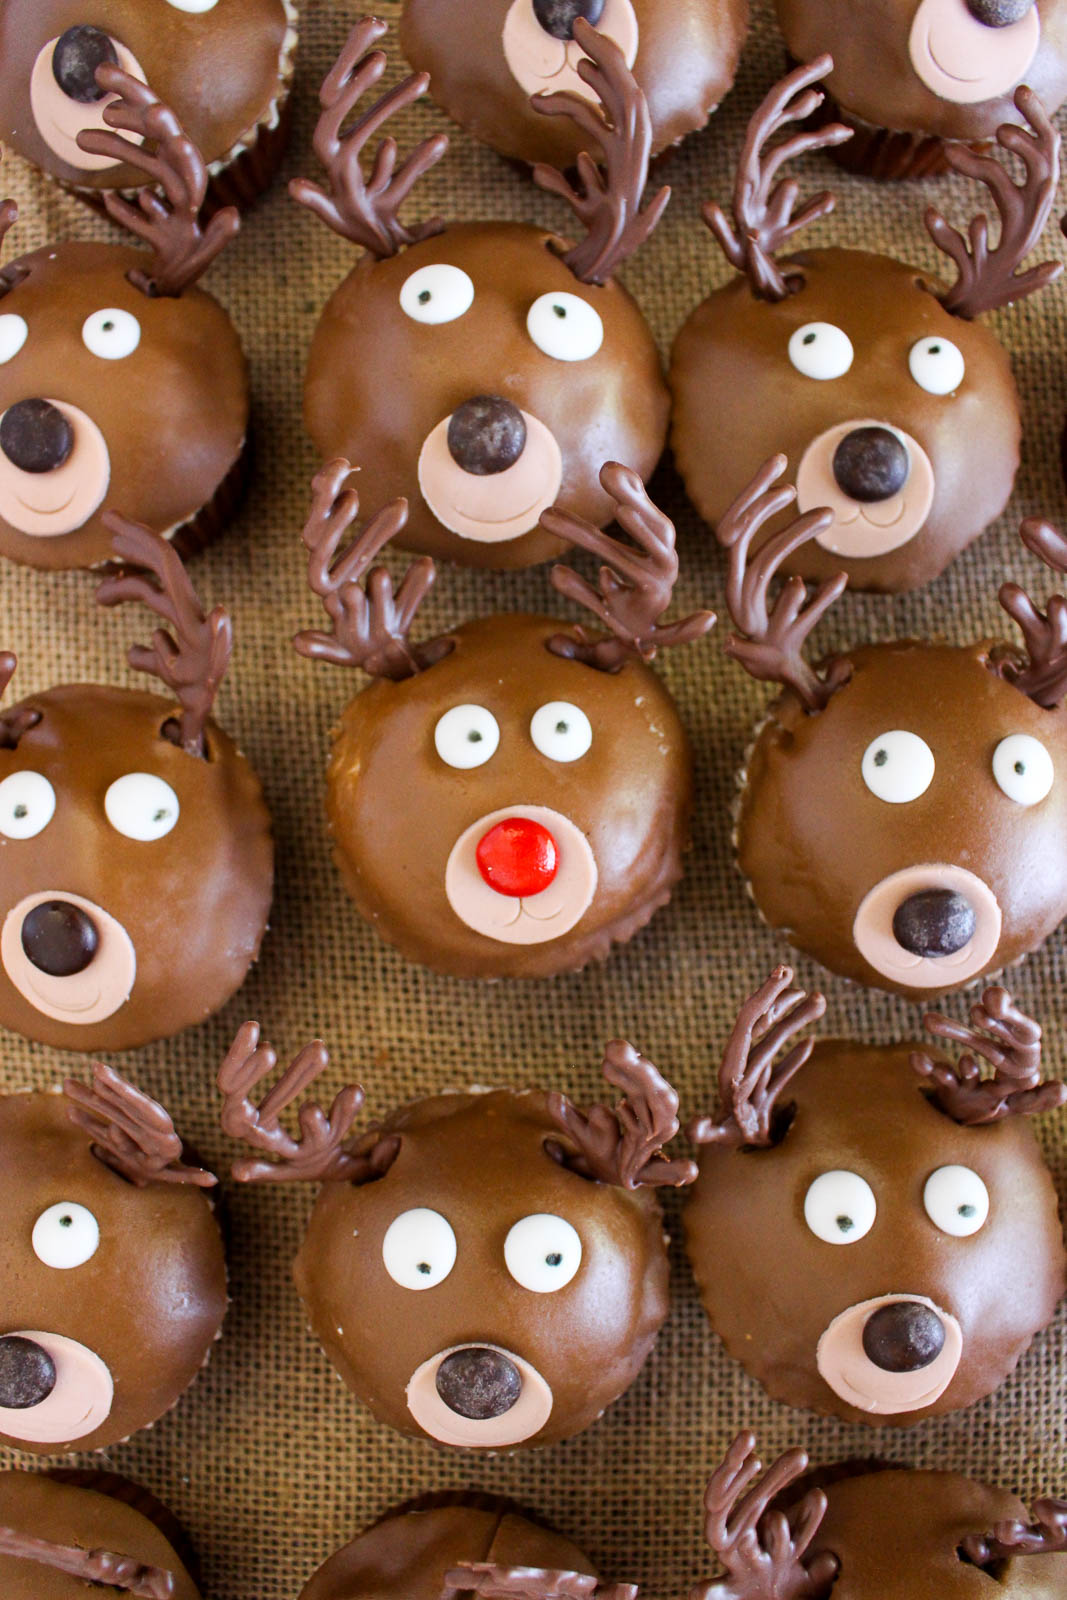
These sweet little faces are almost too cute to eat. A carrot cupcake topped with cute decorations to make a festive party treat!
Reindeer Cupcakes Cassie Cakes

My Christmas baking is running a little behind due to the celebrating starting early. Hangovers make baking seem like a mammoth task...or a reindeer task? But Christmas is important and Santa waits for no one.
Reindeer Cupcakes Cassie Cakes

And these are cute as hell. You know I can't stop saying "as hell". I finish every sentence where I want to be emphatic with it. "That's rude as hell!", "That's pretty as hell!",  "I'm confused as hell!" And my favourite, "That's DUMB as HELL!" Try it. You won't be able to stop.
Reindeer Cupcakes Cassie Cakes

Reindeer Cupcakes Cassie Cakes

Reindeer Cupcakes Cassie Cakes

But do you know what, these are as cute as hell. Of course they're perfect for Christmas but...okay I can't think of any other time of year they'd suit. But that doesn't mean they're any less cute! Perhaps somehow they could be made in to bunnies for Easter. Bunnies like carrots too.
Reindeer Cupcakes Cassie Cakes

So anyway. These darling little cupcakes are carrot cupcakes! Do you know why? Cos what do you leave out for Santa and his reindeer? Carrots, that's what! How twee is that! Carrot cupcakes with reindeer faces! Cute central. If you put 'cute central' into Google Maps, your address will come up with these guys in your kitchen.

Here are some step by step photos for the fondant work.

Reindeer Cupcakes Cassie Cakes
Select a round cutter a little larger than your cupcake.
Knead together white and pre-coloured brown fondant to make a darker shade and lighter shade of brown. Keep the fondant tightly wrapped when not working with the fondant.
Ice the cupcake with buttercream to a slightly domed shape.
Cut a round of darker brown fondant.

Reindeer Cupcakes Cassie Cakes
Lightly press the large over the buttercream.
Using the back of a piping tip, cut a smaller circle from the lighter brown fondant and attach to the darker brown with a tiny dab of buttercream.
Lightly press the edge of the piping tip in to the light brown circle to make the mouth of the deer.
Attach a dark brown M&M to the light brown circle to make the nose of the deer, then add the premade eyes.

Reindeer Cupcakes Cassie Cakes

There is a bit of fondant work with this but it's basically the easiest fondant use ever. Rolling and cutting circles. You'll need two shades of brown for these cupcakes. I purchased pre-coloured brown fondant the colour I wanted to the head of the reindeer to be and then I created the lighter brown by rolling some white fondant in to a bit of the darker fondant. This was easier than buying only white and colouring it. Less mess, less fuss and more consistent results.
Reindeer Cupcakes Cassie Cakes

I used my old standby cupcake recipe and altered it a bit by adding carrots, vegetable oil and some pulverized walnuts. A lot of carrot cupcake recipes out in the great big world seemed more like muffins. They were dense and didn't have the height of a light and fluffy traditional cupcake. Being the Dr. Frankenstein that I am, I simply altered a vanilla cupcake. And it worked.
Reindeer Cupcakes Cassie Cakes

The reindeer also have cute little eye which I made by piping royal icing. I can't tell you how sick of piping icing I was by the end of this, this made far more than I needed. However, once the discs are well dried, you can store them in an airtight container for other projects. To create the pupils, I dotted the discs with a food safe pen. I purchased a specific food pen for this but since making them, I've read that you can use a non-toxic pen purchased from the supermarket, the type kids use for their colouring books.
Reindeer Cupcakes Cassie Cakes

Finally, you will just need to pipe the antlers with some melted chocolate. You can use this template or freestyle it if you've got a steady hand. Make sure you pipe the base of the antlers nice and thick, I found the thinner ones broke easily. To make the chocolate antlers easier to use, make sure they're cold from the fridge and use a small knife to make an incision in the fondant first, then stick the chocolate antlers in.
Reindeer Cupcakes Cassie Cakes

Also, cos it's Christmas, enjoy these photos of my own little reindeer.

Reindeer Cupcakes Cassie Cakes

Reindeer Cupcakes Cassie Cakes

Reindeer Cupcakes Cassie Cakes

Reindeer Cupcakes Cassie Cakes


Reindeer Face Carrot Cupcakes
*Royal icing eyes need time to set so make at least 24 hours in advance. Royal icing eyes can be made well in advance and kept in an airtight container once completely dried.

Prep time: 60 mins, not including drying time

Cooking time: 20 mins

Total time:  1 hr and 20 mins
Servings: 18 cupcakes

Royal Icing Eyes

2 egg whites

1 1/3 cups confectioners sugar, sifted

Black food safe pen
  1. Combine the egg white and sugar in a medium bowl and beat on medium speed for 4-5 minutes, scraping down sides as necessary.
  2. Beat til icing is a thick but pipeable consistency, like molten lava. Add water if the icing is too thick or more sifted icing sugar if too thin
  3. Add the frosting to a piping bag with a small round tip
  4. Lay a large piece of baking paper on to a baking sheet and pipe small circles to make an eye shape.
  5. Allow to dry at room temperature for at least 24 hours before removing from baking sheet. Once dry, dot each eye with the black pen to make an pupil.
Chocolate Antlers
150g chocolate melts

  1. Print out the template and place on a baking sheet. Lay a piece of baking paper over the top.
  2. Melt the chocolate in 30 second intervals until completely melted.
  3. Add melted chocolate into a piping bag fitted with a fine piping tip and pipe antlers on to baking paper, following pattern as on the template. Use a skewer or toothpick to move chocolate in to the gaps as required.
  4. Allow to dry and chill in fridge.


Carrot Cupcakes
110g softened butter
230g caster sugar
2 eggs, free range
150g plain cake flour
125g self-raising cake flour

1 teaspoon cinnamon
1/2 freshly grated nutmeg
1 teaspoon vanilla extract
2 tablespoons vegetable oil
1/2 cup milk
1 cup freshly grated carrots
125g crumbled walnuts
  1. Preheat the oven to 160°C and line a 12-hole cupcake tin.
  2. Beat the sugar and butter together until lighter in colour.
  3. Add eggs one at a time, beating well after each addition.
  4. Sift the flours into one bowl and stir the cinnamon and nutmeg into the flour.
  5. Add the vanilla extract and vegetable oil into the milk.
  6. Add to the creamed mixture alternately with the milk, in three lots, starting and finishing with the flour.
  7. Gently fold the grated carrot and walnuts into the batter until combined.
  8. Fill each cupcake liner two-thirds full, or about 50g on scales.
  9. Bake for 20 to 23 minutes, leave in the tin for 5 minutes then turn on to a rack to cool. 
Vanilla Buttercream

1 cup butter, at room temperature

2 cups icing sugar
1 tablespoon vanilla extract
2 tablespoons milk

  1. Using the whisk attachment of a stand mixer, whip the butter on medium-high speed for 5 minutes, scraping down the sides of the bowl as required.
  2. Reduce the speed to low and gradually add the icing sugar. Once all of the sugar is incorporated, increase the speed to medium-high and add the vanilla and milk, mixing until incorporated. Whip at medium-high speed until light and fluffy, about 2 minutes, scraping the bowl as needed.


Assembly
Pre-coloured brown and white fondant
Colours will vary, use as much fondant as required.
Brown and red M&M's
  1. Ice each cupcake with vanilla buttercream and set aside.
  2. Dust a rolling mat or benchtop with icing sugar.
  3. Knead white fondant into pre-coloured brown fondant to create a dark brown colour for the reindeers face.
  4. Using a little more white fondant, make a lighter brown colour for the reindeers muzzle.
  5. Dust more icing sugar onto bench as required and roll out the dark brown fondant.
  6. Use a circle cutter to cut a circle at a time. Cover remaining fondant with plastic wrap when not in use.
  7. Gently work the circle on to a cupcake. Repeat until all cupcakes have fondant applied.
  8. Roll out the lighter brown colour and use the larger end of a piping tip to cut smaller circles.
  9. Use a dab of buttercream to attach the lighter brown circle to the face of the reindeer, then use the piping tip to lightly indent a mouth into the lighter brown circle. Repeat for all cupcakes.
  10. Using a tiny dab of buttercream, attach an M&M to each reindeers face and a pair of royal icing eyes.
  11. Finally, push a pair of chocolate antlers into each of the cupcakes.

Saturday, 12 November 2016

REVIEW: Pearl Cafe

Cassie Cakes Review Pearl Cafe Woolloongabba

The breakfast café scene in Brisbane has exploded in the last few year, perhaps even as far back as a decade ago.  In this world of revolving door restaurants, opening and closing with the wind, 8 years is literally a lifetime. Pearl Café is a Brisbane landmark, open since 2008. Tucked in the chic café district of Woolloongabba, the café is an anchor establishment. We visited on an overcast Saturday with hopes of some sunny eggs to brighten up our day.
Cassie Cakes Review Pearl Cafe Woolloongabba

The café was busy but not so crowded that a table couldn't be snagged quickly. We sat inside the café, which has exposed brick interiors and the atmosphere of a French bistro. Although perhaps because of the exposed brick, the noise of conversation and the din of café business bounced around with nothing to dampen it. It is a noisy space, but the ambiance is warm and so it's easy to rise above the cacophony.
Cassie Cakes Review Pearl Cafe Woolloongabba

I'd heard things about the Pearl Café butterscotch milkshake. It's legendary around the Brisbane milkshake scene...what do you mean you've never heard of the Brisbane milkshake scene? It's a thing, I'm telling you. And Pearls milkshakes are reputedly a pearler. Ha. Classic. The legend was true. The shake was thick, which is already half the battle won. The butterscotch flavour wasn't the strongest, but the shake wasn't cloying or overly sweet.
Cassie Cakes Review Pearl Cafe Woolloongabba

For meals, we stuck to what Pearl is famous for, the classics. We each chose Two Eggs Your Way with Toast for $11. I choose scrambled eggs with a side of mushrooms ($5). The eggs were scrambled perfectly, they were creamy and buttery. The mushrooms were not amazing, they were a touch bland and the serving size left something to be desired. More mushrooms. Boom!
Cassie Cakes Review Pearl Cafe Woolloongabba

My friend chose her eggs poached with a side of bacon ($6). The poached eggs were overcooked, which I confess I prefer. Runny egg whites turn my stomach. My dining partner though prefers her eggs in the conventionally poached way. Each to their own. The side of bacon though was something to behold. It was thick and caramelised, with lovely crunchy bits.
Cassie Cakes Review Pearl Cafe Woolloongabba

Pearl deserves its landmark status and it's clear to see why it's the anchor café of the Woolloongabba dining district. While some things weren't perfect, it's nice to have a place to go for those pared back, home cooked flavours. Others may buffet about on the winds of food trends, Pearl sticks to simple food, done well.

Food: 3/5
Service: 3/5
Price: 3/5
Atmosphere: 4/5

Pearl Cafe Menu, Reviews, Photos, Location and Info - Zomato

Wednesday, 3 August 2016

RSPCA Puppy Cakes

Make these delicious honey flavoured cupcake with a sweet peanut butter and cream cheese centre and toasted meringue topping to raise funds for the RSPCA and share them with your four legged friend!
Cassie Cakes RSPCA Puppy Cakes
Obviously don't top the human cupcakes with dog-chocolate and bone treats...unless you want to.
Now. I don't know if you know but I love dogs. I adore them. I'm obsessed with them. I have a folder on my phone full of photos I've met on the street. I have over 60 kilos of dog that lives inside my house, two dogs who literally are my children. My puppies are a 6 year old German Shepherd named Stompypants and a 5 year old yellow Labrador named Puca but her name really should be Cheekypants. And I'm working on getting a rescue pug who I plan on naming Sausage.
Cassie Cakes RSPCA Puppy Cakes
Two dignified ladies, ready for their picnic.
As you can see, when I am on the topic of dogs, I can talk forever and I do get sidetracked in lovely puppy kisses and wet noses and wagging tails. My puppies are so spoilt, treats, fresh food, water, daily walks...but not all dogs are so lucky. Some dogs, through no fault of their own, have no warm place to put their fluffy bum and no one to pet their pretty heads. Some dogs are born into puppy farms or on the street. Some puppies are mistreated or suddenly can't be looked after anymore.
Cassie Cakes RSPCA Puppy Cakes
Oh that looks good..
Cassie Cakes RSPCA Puppy Cakes
...can I have it?...

Cassie Cakes RSPCA Puppy Cakes
AWESOME!
But thank the canine stars that we have the RSPCA. The RSPCA do vital work. They house and feed and give life saving medical attention to literally tens of thousands of dogs across Australia each year. And their care and welfare doesn't just stop with woman's best friend! They care for cats, birds, horses, chickens, snakes, Guinea pigs, rats, mice, lizards...all of our furry, scaly, feathery friends. Haven personally volunteered at RSPCA, I can tell you the care they give to animals is outstanding and wonderful.

This care doesn't come cheap. RSPCA QLD needs $42 million a year to keep running. And 99% of their funding comes from donations from people like me and you! And here's where you get to make a real difference. August 15 is RSPCA Cupcake day. All you need to do is register, bake some delicious cupcakes, (like the ones I have made here!) and raise some much-needed funds for those saints at the RSPCA.

What could be more awesome than baking some delicious cupcakes and raising money for a important cause AND EATING THEM! Can you show me the downside? No! Cos there isn't one!

The fun thing about these cupcakes is that you can eat them...and your dog can eat them too! Bake these Honey and Peanut Butter cupcakes, then sit down and share one with your dog! How much fun is that? And then whip another bunch and sell them at your work or your school or invite some people over and have a fundraising puppy cupcake party!

Head on over to www.rspcacupcakeday.com.au and register. Print out some posters and get all your friends and family involved and raise as much money as you can for RSPCA! And enjoy these photos of the puppy picnic I put on for Stompypants and Puca. They were such ladies.

Honey and Peanut Butter Puppy Cakes
These cupcakes are safe for your dog to eat, but please be treat-wise. Dogs don't need sugar. For this reason, these cupcakes are smaller in size. Top with dog treats for the doggies and a rice marshmallow crispy for you!
Prep time: 60 mins

Cooking time: 15 mins
Total time:  75 mins

Servings: 24 small cupcakes

Honey Cupcakes
125g butter, softened 
125g caster sugar
3 tablespoons honey
2 whole eggs plus 3egg yolks (reserve the whites)
1 1/4 cups plain flour, sifted 
1 teaspoon baking powder 
1/2 cup lactose-free milk

Peanut Butter Filling
3 tablespoons sugar free peanut butter
3 tablespoons cream cheese, room temperature
2 tablespoons honey

Meringue Icing
3 egg whites
1/2 cup caster sugar


  1. Preheat the oven to 160°C and line a 12-hole cupcake tin with smaller cupcake liners
  2. Beat the sugar and butter together until lighter in colour
  3. Add eggs and yolk one at a time, beating well after each addition.
  4. Sift the flours into one bowl and add to the creamed mixture alternately with the milk, in three lots, starting and finishing with the flour
  5. Fill each cupcake liner two-thirds full
  6. Bake for 23 minutes.
  7. Meanwhile, add the peanut butter, cream cheese and honey to a small bowl and stir thoroughly to make the peanut butter filling.
  8. Allow to cool while you prepare the meringue. 
Meringue

  1. Wipe a mixer bowl with a paper towel dampened with lemon juice.
  2. Add egg whites to the bowl and whip until soft peaks form.
  3. With the mixer running, gradually add the sugar mixture and beat until thick and glossy.

Assembly
  1. Scoop out a small amount of the cupcakes with a teaspoon or a melon baller. Put the bit aside.
  2. Fill cavity with a generous teaspoon of peanut butter filling.
  3. Replace the cut-out cupcake piece.
  4. Pipe or spoon on the meringue on each cupcake and pass a kitchen blowtorch over the meringue is toasted. Alternatively, place the cupcakes back into a 200°C oven until golden.

Sunday, 10 July 2016

REVIEW: Morning After

Cassie Cakes Review - Morning After
So cool.
Morning After is the relative new comer to the West End dining scene and a darling amongst bloggers. It's easy to see why with it's chic interiors, precast concrete furnishings and hanging plants, it's crying out to be snapped and uploaded with a Valencia filter. However, even though Morning After has all the trappings of an ultra cool café, it's still welcoming with a down to earth vibe and friendly staff. The first thing I thought when I entered was what a great place to bring friends to show off your knowledge of the hippest Brisbane cafes. 
Cassie Cakes Review - Morning After
So Instagramable.

We choose a table along the wall, with a bench seat covered in AstroTurf coloured upholstery. The open and breezy interior was the perfect location for our midweek brunch and heightened my anticipation for our meals. 
Cassie Cakes Review - Morning After
So vanilla.
We started with some drinks or as Morning After calls them, Elixirs. The chai was served in a very pretty vintage style cup with a generous sprinkle of cinnamon on top. The chai was a little underwhelming with the traditional spices tasting under-brewed and muted. Although there wasn't a traditional milkshake on the menu, there was a blend called simply Vanilla, made up of vanilla bean, spiced syrup, ice cream and milk ($8).  Don't order this drink expecting a milkshake, but it was a nice vanilla milk drink.
Cassie Cakes Review - Morning After
So pretty.
Having seen Morning After pop up in my Instagram frequently, I knew the croquettes and the pakora were the signature dishes. Firstly, the Sweet Potato and Poppy Seed Croquettes with Mixed Mushrooms, Manchego and a 63 degree egg ($18). The crust of the croquettes was delicious and gave way to the soft, flavoursome spiced sweet potato mash. In the centre of the plate was a small pile of chorizo and mushrooms with the 63 degree egg balanced on top, with it's yolk ready to spill forth.
Cassie Cakes Review - Morning After
So hashbrown no filter.
Our second choice was the Sweet Corn Pakora, Fried Egg, Haloumi, Avocado, Smoked Corn and Watercress ($16) with an . The pakora themselves had a great flavour punctuated by the pieces of sweet corn. However the batter of the pakora were a bit dense and thick. Everything else on the plate was delightful, especially the cobs of corn. Obviously avocado goes with everything and hashbrowns are always a good idea.
Cassie Cakes Review - Morning After
So chic.
Morning After is not perfect, the drinks were lacking and the pakora were little floury however the staff were attentive and all other food on the plates worked wonderfully. And with interiors and presentation worthy of your Insta followers, it's also worthy of your custom.

Food: 3.5/5
Service: 3.5/5
Price: 4/5
Atmosphere: 4/5

Morning After Menu, Reviews, Photos, Location and Info - Zomato

Saturday, 4 June 2016

REVIEW: Taro's Ramen

Taro's Ramen - Cassie Cakes Review
A pretty temporary looking sign...
Sometimes I surprise myself. Be it by what I say as I have no filter or perhaps it's by my conviction to a cause, usually ice cream. In this case, I surprised myself by never having ramen. Such a common and popular food, especially amongst those who have Instagram accounts. Why has it taken me this long? Well, I don't know. I love Japanese food. And I love soup. And noodles. Look, let's not dwell on the reasons lest we're here all night.

Last time my sister and her husband brought their gorgeous little peanut up to visit, we called in to Taro's Ramen on Edward Street. Taro's frequently appears on the Best Of lists for soup and is a Brisbane ramen institution. The restaurant used to have a more substantial restaurant up at the Koala Building (maybe not the real name but there is a koala statue on top) but the current address is said to be temporary and more of a café than restaurant.
Taro's Ramen - Cassie Cakes Review
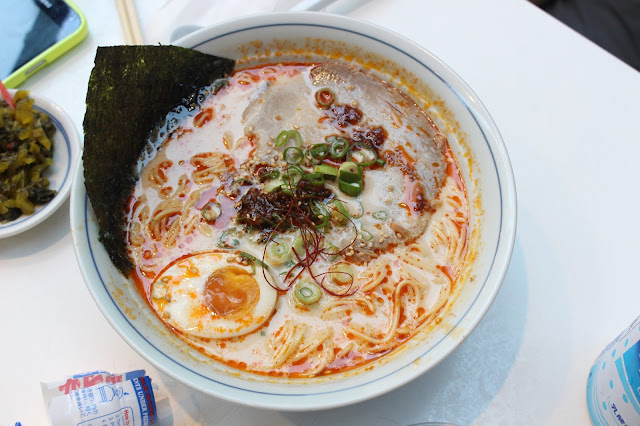
Look at that bowl of yum.
Heeding the advice of my sister who has been to Japan about 354,126,462 times, we got the Tonkotsu Ramen ($14.50) with an extra bowl of noodles ($2.50) to share between two as well as a bowl of Fire Tonkotsu ($15.90). We also ordered some Kimchi ($4.80) and stocked up on the condiments, including a d-load of chilli.
Taro's Ramen - Cassie Cakes Review
Basically literally ate all that chilli.
Tonkotsu Ramen is made from pork bones, boiled basically forever, which breaks down the collagen, fats and marrow which flavours the creamy coloured soup. Since it was my first time, we went traditional. The serve was very generous and the noodles were delicious. I ended up adding a huge amount of chilli because I am me and I love chilli, so I might as well have ordered the Fire Ramen, and I certainly will next time.
Taro's Ramen - Cassie Cakes Review
Should have cut out the middle man and just ordered the Fire ramen. Note to self: always get the hottest dish available.
The Fire ramen was a party in the mouth and I was very jealous of my brother-in-law. Although he did struggle to finish the bowl on his own. The egg in the fire flavoured bowl seemed even more unctuous and moreish. Everything about ramen is amazing and what took me so long! I wonder why kimchi is served with a Japanese dish, since kimchi is Korean but why look a delicious preserved cabbage horse in the mouth.


Taro's Ramen - Cassie Cakes Review
This shot was taken by my drone cam.
Taro's Ramen was great and my experienced ramen eater guests agreed that is was a great introduction. I would love to visit the Ascot restaurant and dive deep into the different varieties. Can't wait to keep this ramen exploration going! 

Food: 4/5
Service: 3.5/5
Price: 4/5
Atmosphere: 3/5


Taro's Ramen Menu, Reviews, Photos, Location and Info - Zomato
Powered by Blogger
Design byJasmineJoy